Welcome yet again free folk of Middle earth to another addition of the Hobbit Hollow Construction Blog! Ah yes, we’ve done it. We have actually completed the most difficult and complicated part of the Hobbit House. Well….at least the part that I think will be the most difficult and complicated. It was a rough pour, as well. A technically difficult pour as well as physically tough. I had two masons there to help me but I really should of had three. It would have made it a whole lot easier. We’ll get to the nuts and bolts of what we did and how we did it a bit later.
I don’t know if you read that little short post I wrote Thursday night but I actually did get a good nights sleep Thursday. Friday night not so much so. If I got three decent hours of sleep Friday night before the pour it was a lot. I think I had a bowl of Rasin Bran Crunch for breakfast around 4:45 AM and headed over to the house while it was still dark….I love Rasin Bran Crunch. I was so excited about the pour I only let myself have a single bowl of it. (For the record I’m a two bowl in the morning Rasin Bran Crunch guy….when I have the time that is.)But let’s get back to the task at hand…pouring a Hobbit house roof.
So, and I’m just gonna put it out there….Pouring this week was a bit of a stretch. Man, did we still have a lot to do. I mean this list I had kept metastasizing like every hour on the hour. It was driving me nuts! I was thinking of stuff and writing it down on scraps of paper and stuffing it in my pocket so I could put it on my main “List of Things to Do.” I had my yellow legal pad next to me when I was driving home every night. I almost drove off the LIE at the exit ramp for Route 108!!! That was a close one my friends.Whew….glad I got home in one piece that night.
So as I was saying, this past week wasn’t just about the roof pour. It’s really about getting everything ready for the roof pour. Once you make that commitment to go for it you really do have to deliver….and as we have said many times in the past: a lot can go wrong with a concrete pour….a real lot. Between missing jacks, missing skewback, forgetting to nail something, lining up the curbs properly, figuring out where the potential spots for blowouts might be,electrical issues, skylight issues, scaffold issues, bracing details, and a small host of other things I was like a chicken running around with my head chopped off. I mean I actually had visions of the whole deck collapsing! Whoa, take it easy Jim you actually do know what you’re doing! Needless to say I worked with lights on Friday night to try and finish up….and just for the record I didn’t really get to finish everything I had on my list. (It was just some extra bracing for some added insurance.) Like I said, that whole deck collapse thing started to get inside my head for some reason and I was having trouble shaking it.
In that same vein it really is amazing how much weight lumber can take without breaking. I mean we had some serious weight going on up there. As I have stated before you have to really think about the forces that are being produced by this kind of concrete pour and plan your framing accordingly. If something snaps or moves during the pour operation it’s too late….and the results could be catastrophic depending upon what gets missed and why and where.
I know I mentioned it last week but one of the things I wanted to do was install a little sign in the ceiling. You know like a little title block somewhere. After a bit of thought, and realizing I didn’t have a lot of time, I came up with, “Hobbit House I 2014.” Pretty simple. I thought I would put it in the mechanical room. This way 350 years from now someone who is doing their laundry will look up and say ” I wonder what in the heck that means?” It’s for posterity’s sake people! So I’ve never done this before, and I didn’t have the luxury of time as I’ve mentioned so I figured just do the best that you can and see how it comes out. If it comes out really bad or wrong we’ll just patch the ceiling over it. I mean it’s going in the mechanical room. Then I remembered….Bob’s friend Steve knows how to do this kind of stuff. You know all that fancy routering kind of stuff. So I called Steve and asked him to stop by and give me the old routering 101 class after dinner Monday night. You know like a refresher course.
Steve really is a great guy. I mean he got over here right when I needed him to. He’s like a hands on kind of a guy. I mean he did get a little off track at one point…started talking about a Dark Lord and a Ring of Power and something about the end of the world. I was like …What? So what we did was draw the mirror image of the title block on graph paper. Then I took a piece of MDF (Medium Density Fiberboard) board and laid out the graph paper letters on it so I could figure out what size piece I would need. Then I used the graph paper layout to help me transfer the letters onto the MDF board. Then Tuesday night I used the plunge router I picked up at Home Depot to route out the letters. It came out okay for a first time try with no practice. Oh yeah, here’s a picture of Steve working on the layout.

Not sure if Steve liked my wife’s cookies. He’s always got that face on. Anyway, the way you check your work is by holding it up to a mirror. When you hold it up to a mirror you should be able to read it the right way. If you can, then you’ve done the layout correctly. Here’s what it looked like before I installed it Saturday morning before the pour.

I’m not entirely sure I made the right decision with the MDF board though. I’m not sure how it’s going to react with the concrete. It was great stuff to work with router-wise though. The router bit went through it like…..a hot knife through butter? Or as my Father might have said, something else through a goose. So we have to keep in mind that there’s a lot of trial and error here at the old Hobbit House. This whole thing is in a sense a big experiment if you will. So it’s going to be real interesting to see how a lot of these items play out later on.
So just a couple of additional items. Prepour wise anyway. So one of the things I wanted to try and get right was the skylights. The problem with the skylights is that the outer walls are not supported. They’re just hanging there and there is this sagging issue I wanted to rectify. We had some pieces of skewback supporting them but you really don’t want wood in the pour and most of them bent anyway under the weight of the wall. So Jude met me over at the house Friday night and we cut brick ties to fit under the four corners of each skylight. Simple. Done. What???!!! You don’t know what a brick tie is??? I mean what’s the matter with you Moe? Everyone in construction knows what a brick tie is. Okay, so there’s no stupid questions right? Right. Yeah okay…you can say that but I’ve definitely heard some stupid questions in my day. This isn’t one of those times though. The short answer. Brick tie is an embedded item used to hold brick or block to a concrete wall. You nail it onto the formwork where the bricky needs them and when you strip the forms off the concrete the brick ties say embedded in the concrete all good to go for the bricky. Get it. Here’e a picture of the brick tie with the stuffing taken out of it supporting our skylight corner.
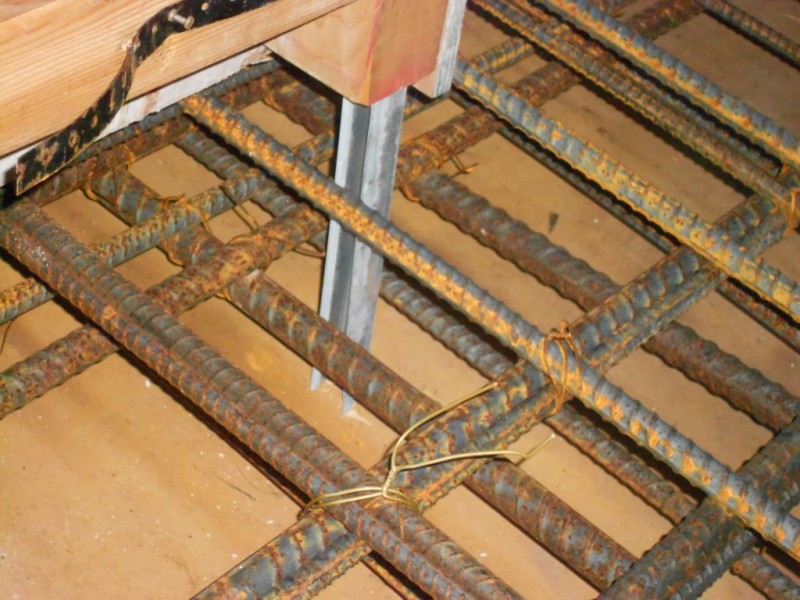
Another prepour issue was the electrical high hats. I’m guessing that most of you have never been on a deck when concrete is going on. That said, take it from me, you’re not going to be thinking about the wiring connection into the high hats when you’re pouring 80 yards of concrete. The last thing you need is to have someone step on the hi hat or on the wire connecting the hi- hat and ripping it out of said hi -hat. That would definitely not be good. Especially when you go to wire the hi-hat later on and you can’t find the wires. So what I did for a little bit of insurance is add some extra rebar over the top of the hi-hat so somebody’s concrete boot doesn’t destroy it or the wiring connected to it. I had short pieces of rebar everywhere so I just took a few up to the deck and tied them off Saturday morning. Here’s what the final product looked like.

An once of prevention.
I’m kind of jumping around a bit but you get the gist of things. Every little item gets us closer to being ready.
Like I was saying before I didn’t get much sleep Friday night before the pour. I was constantly thinking of things to do and how the whole pour thing was going to play out. Now this next prepour item may seem insignificant to some but to others, and I’m talking about anyone who has ever worked outside on a hot day, it really is a big deal. Do you really think I would entrust Tweedle Dum or even Tweedle Dee to fill the water jug up on a day like this? What’s the saying,”Fool me once shame on you, fool me twice shame on me.” I’ve been fooled more than once here and I was determined not to be fooled again. I don’t know how many of you have watched the movie “Up” but I was headed to be wearing the “Cone of Shame”. Don’t have the time to explain that one but “”Up” is well worth watching for people of all ages….and the “Cone of Shame” is hilarious. I actually filled up the water jug the night before the pour and threw a bag of ice in it. The ice was still in there the next morning fellas….and I’m talking specifically to Jude and Terence. Procedure: 1. Rinse out water jug. 2. Turn on cold water. 3. Double check and make sure you actually have the cold water on and not the hot water. Check,check. 4. Fill up water jug leaving room for a bag of ice. 5. Put a bag of ice in there and put the cover back on. I have to do it this way people or my message won’t get through. It reminds me of when you go to the troubleshooting guide of a product you just bought and line item one is “Make sure your device is plugged in.” Sometimes a visual helps.

Starting to kick an old dead horse issue here Jim. Let’s move on shall we?
It’s a teachable moment. That’s all I’m gonna say.
Just one more: Maybe I should write the directions on the water jug????
Saturday arrives:
Like I said I woke up early Saturday morning and stared getting ready. I got over there around five and got to work on a bunch of small ticket items moving from one to the other. My list is finally becoming a bit more manageable. So the crew I had coming consisted of my two sons Jude, Terence, and Jude’s friend Kevin. Two laborers from work, Albert (Who helped us on our footing pour if you remember)and Pedro, (He was the concrete foreman at Rego Park) Darren, (Who helped us out with the wall forms once before) and two masons Ronnie and Sean. Ronnie’s from the Bronx and almost hit a deer on the way up. So he was a little freaked out by the time he got to the site. Seeing a deer next to the road is like a big deal for city folk. Almost hitting a deer was probably more like seeing a deer grazing in a field somewhere on route 55.
I asked Darren if he could get there early, like 6:30 and start getting some of these other critical items done before we start pouring. He said fine, and him and Sean showed up just when I knew I was going to start needing help. That was like a totally good move. I had enough time to explain what I needed done and get a few more things done myself as well. Now that list is finely getting real small!
Like I said I went over this pour a million times in my head and I really wasn’t too sure how to do it. There was a lot of little stuff to do but I was thinking between myself, Albert, Pedro, Ronnie and Sean I thought we would be able to handle it. I had Darren come up to help finish a bunch of little things and keep an eye out underneath, just in case. I figured Jude would be at the end of the pump hose and Terence and Kevin would take care of the vibrator. There’s a lot of vibrator work on a pour like this and you need one guy using the end of the vibrator in the concrete and another guy holding the motor end. It probably weighs in at 60 pounds. Albert wound up taking care of all the vibrator work. That was a good move.
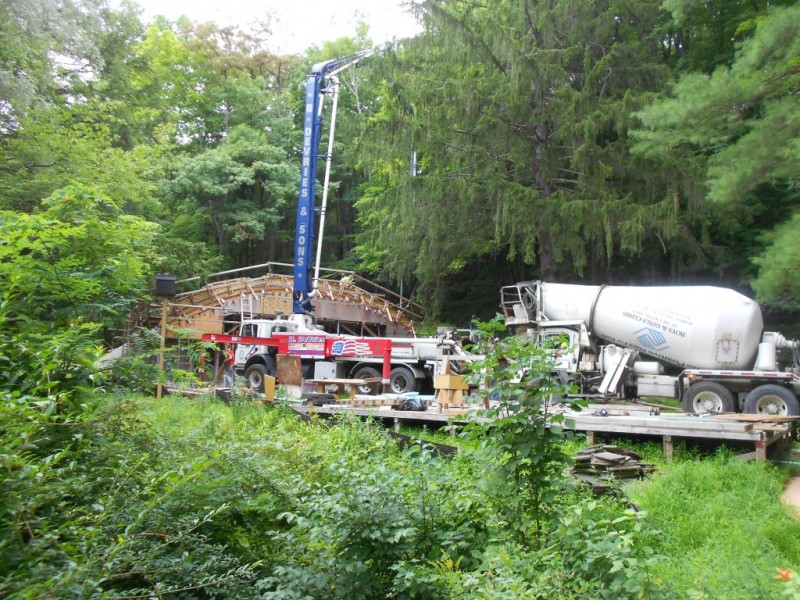
Best laid plans.Our first truck arrives!
Initially I was thinking we would do the four corners first. That’s the steepest part of the roof. A couple of things. When you pour concrete on a sloping surface like a set of stairs it rolls down that surface if you will.When we do a set of stairs at work we usually mix the concrete to like a 5 inch slump or so. If the concrete is too wet you won’t even be able to pour the stairs. You’ll have to wait until the concrete starts to set up…and that can be a while. It can be 45 minutes depending on temperature and what kind of concrete it is. (We’re definitely not going to be able to wait a while.) 5 yards of stairs is one thing 50 yards of sloping roof pour is quite another. I should have had another mason there. That was my fault. On top of that, the first truck of concrete through the pump has to be wet. If it isn’t wet the concrete is going to get jammed in the pump. (That happened on our footing pour remember?) We don’t need a jam at the start. That wouldn’t be good.
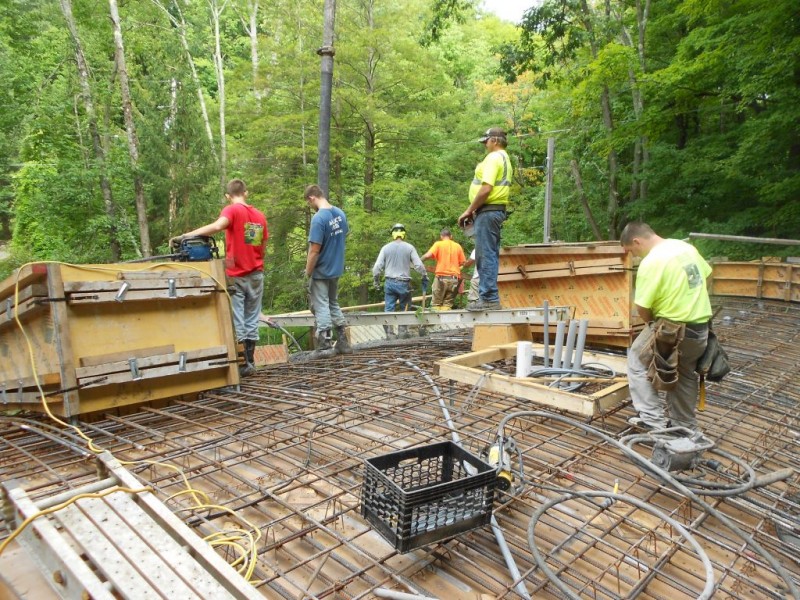
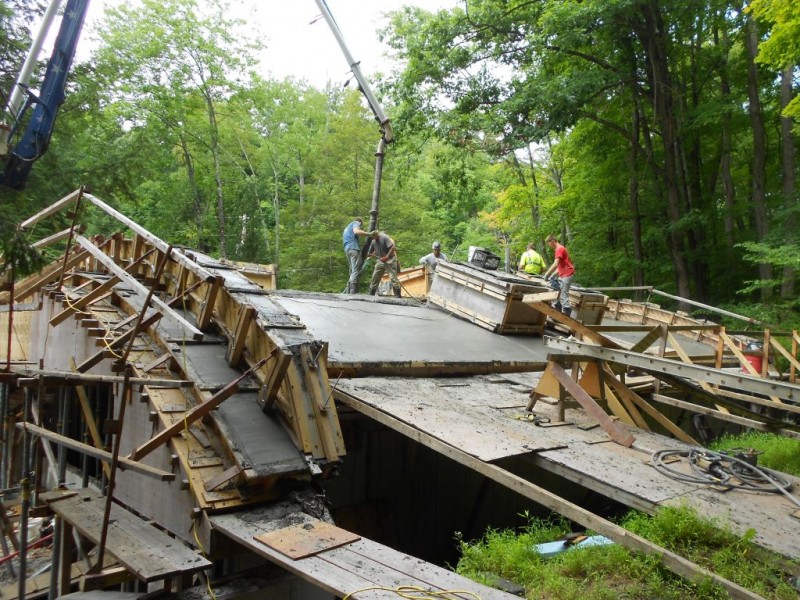
Well my thinking was to start in one corner and seal it and then run a small strip at the very bottom of the slab along the walls and work our way around the house. You know, start in the corner. pour the strip along the east side, do the adjoining corner. Move the pump to the west side, do a corner, pour the strip all along the west side, seal the last corner. Then move the pump to where we began and start all over again working our way around the house. I think this would have worked fine if we just had the slab to do. The problems arose when we started to do all the little stuff. The spandrels, the retaining wall curbs, and the skylights. This kind of stuff is very sloppy and slow. When you pour this kind of stuff you can only do a little bit at a time and it’s inevitable but you wind up overpouring in these areas and you have to take concrete out. On top of that the curvature of the roof line makes it that much harder to vibrate. As soon as you hit the concrete with the vibrator on a sloping section it all runs down hill and piles up in one area. (Or goes off the roof and onto the footing.) On top of that we really have to vibrate everything really well so all the detailed work we did comes out nice.So it was tough. Really tough.That’s where one more mason would have come in handy. Here’s a picture at the start of the pour.

If you look at the bottom left hand corner you can see what a sloppy mess we had on our hands with the spandrel. You couldn’t do anything with that area for at least 40 minutes. But you’ve got to seal the bottom and get that part started. Or you’re just asking for more trouble later on.
The other issue,which I forgot to mention, is the Styrofoam thermal barrier I installed had to get poured a certain way. It’s installed against the inside face of the curb. So you have to pour the outside spandrel so the concrete pushes it up against the formwork. If you pour the slab part first the concrete will push it out of position and away from the formwork. This will create a gap that we don’t want. This happened on one side but we were able to fix it.
Just a couple of other things in that picture. I set up two aluminum scaffold planks on each side of the house. This way if we needed to get off the roof we could just walk along the plank and not mess up the concrete we had already poured. I put one end on a step stool and the other on a saw horse that I braced up really well.
Just to the left of the aluminum plank is our screed gauge. This is what we pour our concrete to so we know that we are pouring to the correct depth. Remember this is a tapered slab. It’s a 16 inch slab at the wall line and 9 inches thick at the peak. I made two long gauges and two short ones. We just moved them around where ever we needed them during the pour. This is where the scaffold planks came in handy…when we had to walk down to the scaffold and move the gauges.
So. How do we pour the skylights if the top is almost 3 feet above the top of slab? Good question! I’m glad you asked. What you have to do here is prepour the bottom. Then come back and top it off after the bottom has set up a bit. Now prepouring this was a bit trickier than usual because of the sloping nature of our pour. When we went to “choke” the skylight the concrete just kept running out of the bottom and down the slope of the roof. Eventually though we were able to get enough concrete in there to seal it. Like I was saying before we had to try and vibrate all the formwork really well so our details would come out good. Albert was in charge of the vibrator crew and I think they did a hell of a job. We’ll see how everything comes out.

It’s kind of hard to see but I put a piece of plywood over the top of the skylight so we could pour away and not worry about getting a ton of concrete inside of the box. This was a good move. We actually put a kicker on the bottom end of the plywood so Jude could stand on top of the skylight and not slip off. Here’s Darren nailing on the kicker.

What a mess right? Good thing I put that extra steel over the hi-hats.
A few more pictures.
If you look to the right you’ll notice Darren working on an upturned pad for our conduits. What I wanted to do here was create a gravity type drainage plane for rainwater. I didn’t want to possibly have water pond at the top of the roof if it came out to flat and then start to have water collect there and seep into the house. So I made a 4 inch high pad and ran it around the conduits. We used brick ties to hold it up off the slab to the 9 inch pour height and then used our friendly neighborhood bandng wire to secure it to the deck. We didn’t nail the banding wire to the deck either. Darren looped it around the bottom rebar mat and them nailed it off. I also put a little pitch on the top of the pad so that water drains away from the conduits. After we poured this area I had Darren go back and put a torpedo level on the conduits so that they are nice and plumb. It worked out pretty well.
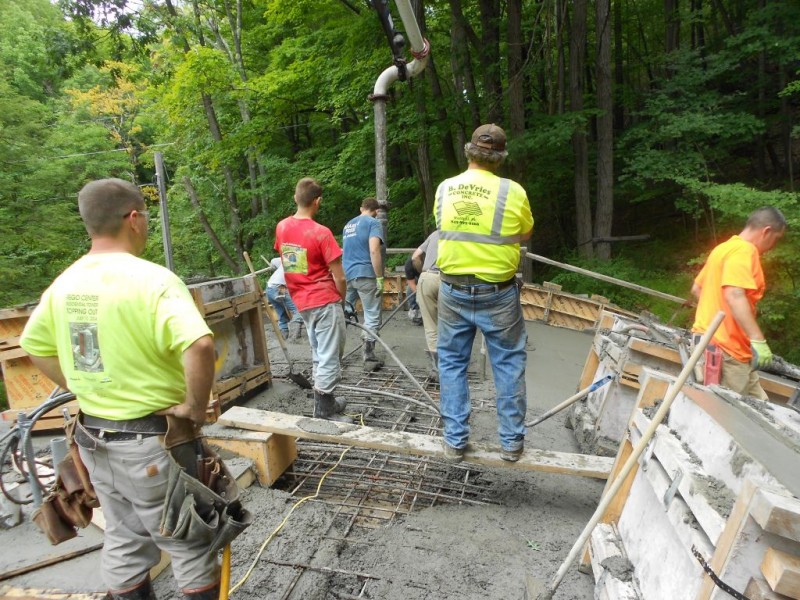
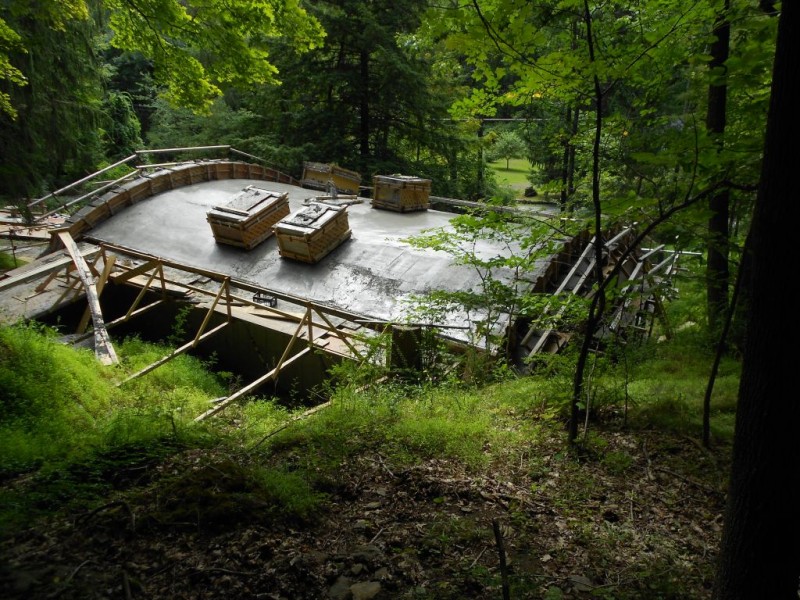
This is actually a good picture. This shows how we finished the pour. I had set up a series of planks so we could work on the skylights that are on the east side. So we just added a step stool and a plank to extend that scaffold to get off the floor. It doesn’t seem like much but everything we had up there has to come off and you don’t want to leave a set of tracks in the concrete.
You can really get a feel for how steep the pitch is at the bottom of the spandrel in this picture. It’s probably around a 7 in 12 pitch for all you house framers out there. That’s about a 30 degree slope for everyone else out there. I don’t know if that helps. (As far as the editor is concerned, I know numbers like that don’t mean anything to her, what that means is that you could probably walk up a 30 degree slope for about a minute. Then you would be tired. Well the editor has been going to the gym as of late, so I could be wrong. Hmmm. Make it two minutes.)
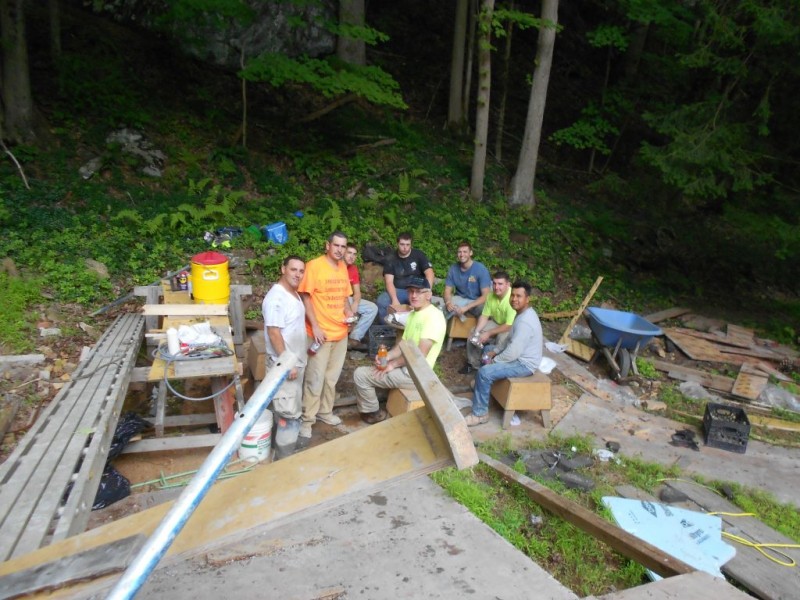
Ronnie, Sean,Terence, Albert, Kevin, Jude, Darren, Pedro. Pump Operator Lee not pictured.
I think one of the things I really enjoy here is it’s just so different. This was definitely one of the most technically difficult pours I’ve ever done. Or been a part of. In hind sight I think I might pour the next Hobbit house a bit differently. I think I would pour the corners first and take care of the retaining wall curb along with it right at the start. The problem with this is that it’s really slow and it’s a lot of movement with the pump. It being a Saturday and all and this being the only concrete plant opened on a Saturday they wanted us to hurry up and finish so they could close the concrete plant down. I’m guessing but doing the pour that way probably would have added about an hour and a half to the pour. We started pumping at 8:20 and finished up about 12:15, which wasn’t too bad. Ronnie the mason was totally shot. I mean he was dead by the end. The pour nearly killed him. I think I only let him have one cigarette break. Cigarettes are bad for you anyway Ronnie….so it was kind of like I was doing you a favor. Actually, Ronnie wanted to kill Albert by the end of the day. I wasn’t paying attention but Ronnie probably wanted to kill me, he just took it out on Albert. Thanks Ronnie. Albert got back at everyone by the end of the day though. He had his last laugh so to speak. Albert’s hands are huge. His fingers are like sausages. At the end of the day when he shook mine and Ronnie’s hand it was like putting your hand in a vise and having someone turn the handle. It was the first time in my life that I had to kneel down before I finished saying goodbye to someone. (I put my hand in that jug of ice water. Luckily I had filled it properly and it was still cold.) Another view.
One of the other things I’ve been constantly worrying about over the last year is the framed out deck itself. I think after every storm we’ve had I’ve been like: There’s going to be a tree crashed through that roof deck and I’m going to wind up having to start all over. Now? Well now I think a whole forest could land on that house and it would still be standing. Which is one of the positives about this kind of structure. It’s forever. Even though I’m going to waterproof the concrete and all, I really don’t think it’s necessary in the end. Everything is pitched and sealed. There will never be any water damage through this type of a roof system. Yeah maybe a skylight might get broken but the way I’m going to set that up even that won’t be that big a deal. On my comments page someone once posted that this is what they need out in Tornado Alley. I’m not interested in testing that theory out but I bet dollars to dounuts that this would hold up really well in a tornado.
One other thing about this structure. I don’t know how many of you are into reading about building science and all that but this structure is also the ultimate in thermal mass. Meaning it has the capability of storing heat and or cool, depending on the time of year. We poured 81 yards of concrete Saturday. That’s a lot of mass. That’s approximately 328,050 pounds of concrete just in your roof. That doesn’t include the 16 inch thick walls or the slab we are going to pour. Once that mass reaches that 68 degree temperature it stores it and helps keep the ambient temperature of the home from fluctuating. It will really be interesting to see how this little old hobbit House performs. I can’t wait.
On a final note, I’d like to thank everyone who has helped me along the way either with physically helping on the job or encouragement or with their prayers. Just seeing the volume of people clicking on my website really helps out believe it or not. A special thanks to my children Georgia, Ethan, Jude, and Terence, who have been such good sports about all this. I know it’s been rough but I knew we could do it (Thanks for all your help guys!). As for my editor and wife: Words cannot describe how much you mean to me and I know how hard this trip is for you. I can’t tell you how much I appreciate your support and grace. This project is totally meaningless without you. I love you. Thanks Jo. Thanks, a whole bunch.
To the Free folk of Middle Earth: The Unexpected Journey continues!
I bid you a fond farewell! (til next week, that is!)
Thanks!
Jim
I am so excited for you! Congratulations. Even if it turns out to have mistakes (I’m not expecting such) just attempting this project is amazing. Go you and yours! When do you get to unwrap the present?
Sally! Thanks for stopping by!
We stopped by Sunday afternoon to check out our handiwork. My sons Jude and Terence had to strip something off right then and there. It was fun.
I actually started doing the same Monday after work. I couldn’t contain myself. Things look pretty good so far. I’ll have some pictures in the upcoming blog post!
Thanks for your support. It’s really appreciated!
Jim
PS: My son found an unbelievable looking spider at the site about a week ago. It was like a transparent green. I’ve never seen anything like it before. I’ll try to get it on the blog someday.Take it easy!
Well done team!
Aj: Thanks for the support. It’s definitely a team effort. Unfortunately most of the team is heading off for college. We’ll get there though. One step at a time!
Take care!
Jim
Congrats!!!!!!!!!!!!!
Thanks Mike! Hope everything’s going well for you and your wife down in Florida. With any luck I’ll have this Hobbit House done in a couple of years!
Take it easy!
Jim