They were men once……great kings of men. Then the Dark Lord Sauron offered them Rings of Power. Blinded by their greed they took the rings without question and one by one fell into darkness. And now they are slaves to his will. They are the Nazgul. Ringwraiths, neither living nor dead. They serve the Dark Lord searching for the One Ring. They are coming…….
Before I forget: The editor is not feeling well so editing duties are passed to Terence. (Let’s hope he does a good job.)
Been thinking of the Ringwraiths as of late for some odd reason. That’s what happens to you when you’re a Lord of the Rings geek like me. Crazy stuff just pops into your head. I also happen to be a bit of a Star Wars geek as well, just to keep you all informed. Like “You’ve never heard of the Millennium Falcon?????” It made the Kessel Run in less than 12 parsecs!” That’s the kind of stuff I’m talking about. Like my friend at work Johnny always says, “There really is something wrong with you.”
Hmmm. Maybe there is.
Anyway, I’m glad you’ve come back to visit and keep up on what’s going on. Welcome. It’s much appreciated!
So where were we?……….. Oh yeah boxers and briefs.
There are two camps in the men’s underwear department (and I know I’m going out on a limb on this one). There’s the loose fit boxers and the tighter fitting briefs. I happen to be a briefs guy my sons all happen to be boxer guys. I’m really not so sure how this happened. Maybe it’s some sort of let’s rebel against dad thing but I think it’s deeper than that. Maybe not. Needless to say I’ve been mocked by my boys for wearing “Tighty, whities” for quite some time now. It’s part of being a father I guess. Anyway I had all these briefs in my underwear drawer (and I’m talking about a lot like over 14) and now I have 5. Not only that but the stretchy waistbands are all over stretched. Like some clown son of mine overstretched them on purpose. I mean it’s almost impossible to overstretch a stretchy waistband. Yet all of my briefs are overstretched. There is absolutely no way my weight loss/gain cycle could have done this….and what about the missing briefs? Of course when I confront the boys on this they give me the blank stare and the “What???” response. But I’m getting the feeling that there is something foul in the air. Hmmmm. Maybe the Dark Lord offered them Briefs of Power? I don’t know. I’ll have to tell the editor to go to Marshalls and pick up some briefs for me. I’m getting a bit desperate. (It’s embarrassing !)
Gotta move forward here Jim. The missing briefs situation is going to have to wait. Let’s move on shall we?
Good idea.
Cleaning up at the Hobbit house the other day and found this.

So this was underneath a piece of plywood. Just so you know Hobbits love their mushrooms. I happen to love mushrooms as well. I had the mushroom soup over at this little soup place on 31st Street the other day. I love mushroom soup. Maybe Sally H. can let us know if these are edible or not. There’s some crazy mushrooms out there so you’ve got to be careful.
Getting back to the house I figured I’ll just show you a clear shot looking out the back. I finally got the scaffold down and it looks really nice. Check it out.

Not a bad view to watch the seasons go by.
Okay, so let’s get into the plumbing.
So, all of the plumbing that I’ve done over the years has been in conventionally framed homes. Meaning you frame a house with walls and the like and then you do your rough plumbing work. Meaning vents and drainage for the most part. But this here old Hobbit house is a bit different. All of the drainage for the toilets, baths, and sinks are going to be under the slab. So we will never really have access to it after we pour our first floor slab. Yikes!!! Anybody getting nervous out there?
So yeah I’m not 100% sure on how to approach this whole thing. This is what I came up with.
So just to recap the sequence here. First, goes the plumbing. Second, 8 to 18 inches of gravel. Screeded completely flat and tamped. Third, 10 inches of EPS styrofoam treated with borate to prevent termite and ant infestations. Then the slab on top. Left a few of the minor details out there but you get the gist of it.
Anyway there are a few tricky parts to this plumbing installation the first of which, is where the heck does everything go? The walls haven’t been framed yet. So we have to lay out exactly where every plumbing wall is, so that our drainage pipes come through the slab in a wall partition and not in the middle of the living room. That wouldn’t be so good. So I’ll just walk you through what I did with a series of pictures. Terence is starting to wonder.
Like I said we have a 6 inch slab on 10 inches of styrofoam on a bed of gravel. So I wanted to set a 2×4 up on the wall to indicate the top of gravel. This way when I put the gravel in I’ll have a good way to show everyone how high we are going. this also worked well because I set the 2×4 up to the edge of slab which is where I pull all my measurements from. It just made everything so easy. Check it out.
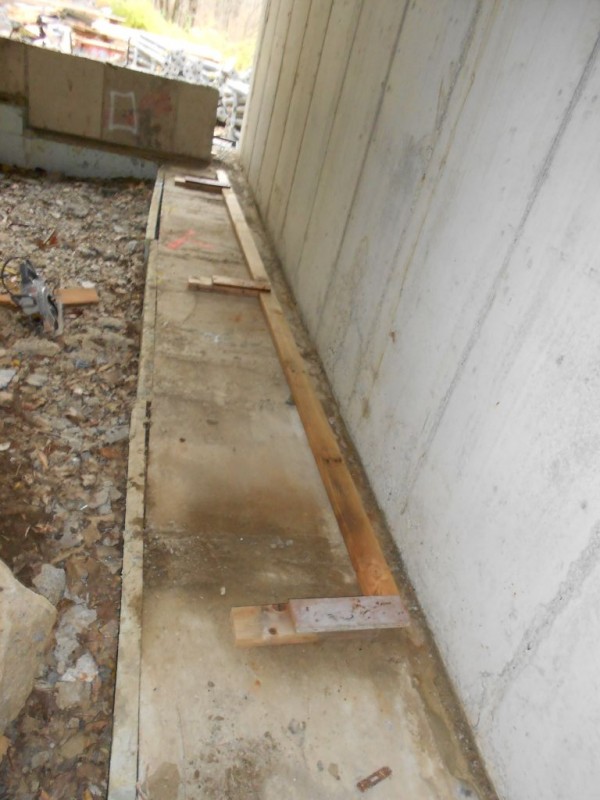
You’re not sure what’s going on right? Pay attention it gets better.
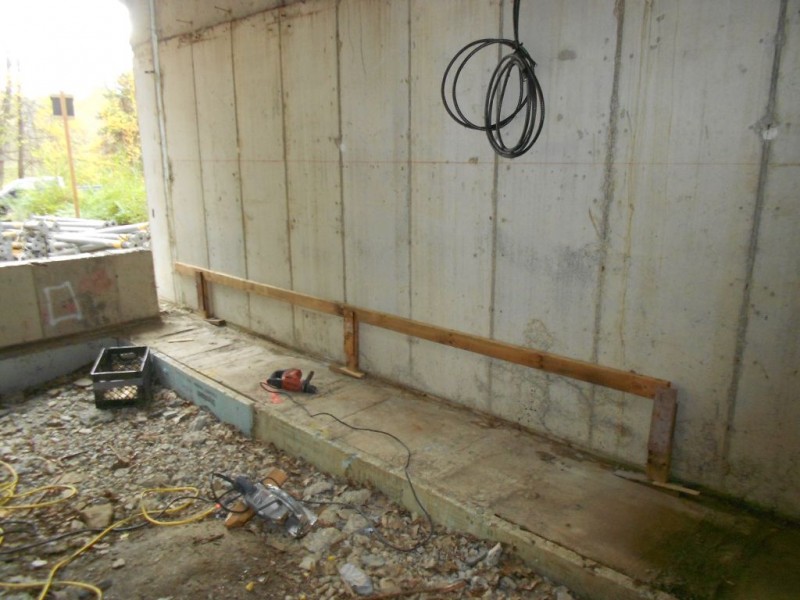
Once I had this thing standing up I measured down from my reference line and then shimmed the 2×4 to the correct elevation. Once I liked where it was I used the TE-7 to secure it to the wall.

So the bottom of this 2×4 will be the top of the gravel bed. Pretty simple.
The next thing I did was locate my first plumbing wall which is running perpendicular to the ledger. This wall is going to be 6 and a half inches wide to accomodate the plumbing. So my largest pipe will be 3 inches in diameter. Check out how I set this up.
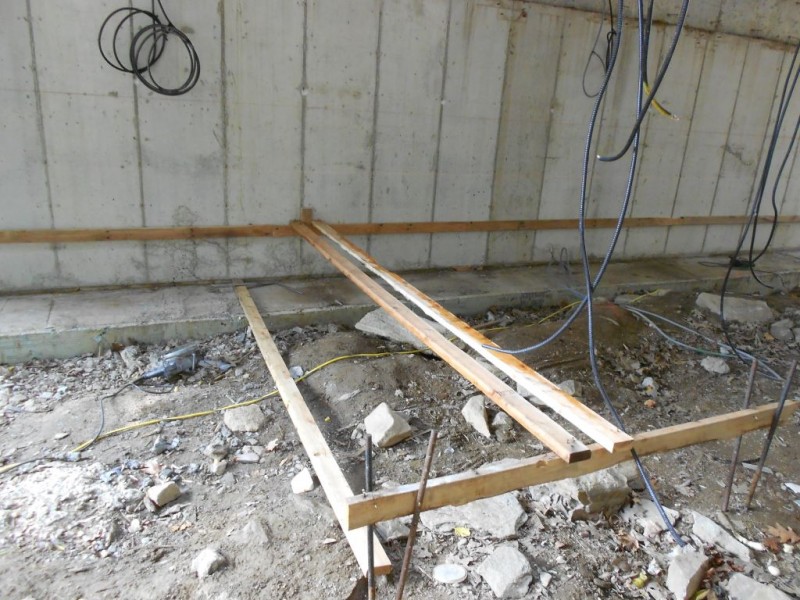
So what I did was nail a 12 foot 2×4 onto the ledger and then ran it out to a 2×4 batter board that was set up at the same elevation as the ledger. I used my 3-4-5 triangle to square the 12 foot 2×4 up and then I nailed it to the batter board. 1-2-3 done. Or as the plumbers would say forgetaboutit! So the piping is all related to those 2×4’s. I just have to lay out where my sink toilet and tub are going to go and we’ll be ready to start laying pipe. Well. there’s still a bit more to it but that was all I had time for this week. Terence had his final game this week so we had limited work time. (Terence played really well by the way even though they lost in a bit of a blowout.)
Anyway, you’ll get the method to my madness as we go along here. Next weekend I hope to hit the plumbing real hard. I also hope to get some hired help to finish off the exterior cleanup. That would be a big help.
…and so Free Folk of Middle Earth that’s all for this week….and keep an eye out for those underwear bandits for me will ya!
Take it easy!
Jim
First, I have no idea about the mushrooms. You’re gonna have find someone else to ask. I’ve tried (rather unsuccessfully) to grow shitakes on purpose, but haven’t ever gathered wild ones.
As for the plumbing, don’t you want it inside your envelope? above the insulation? The drain pipes I could see being outside, but all the flow pipes too? Explain the logic, please.
Are you using radiant heat in the floor?
Hello Sally! I can’t believe I’ve finally stumped you. This is a first. There’s probably some old Indian medicine man who lives down the road from you who’s gonna identify these mushrooms. (Just kidding.)
I just kind of threw the mushrooms in there because I knew you wouldn’t be able to resist responding. I really do appreciate the comments.
So about the plumbing. Everything will take a little time but yes all the drainage will be below the insulation level. As the piping comes through the first layer of insulation we’ll put an air barrier down (6 mil poly) and seal all the pipe to it. This will create an air sealed vapor barrier. We’ll put another layer of insulation on top of this to protect the air seal.
All of the water supply lines will be above the slab. The well water will come in under the slab through a 1 inch poly pipe and we’ll air seal that as well.
As far as heating the house we’ll be using what they call a ductless minisplit heat pump for our heating and air conditioning needs. This type of house doesn’t need a large heating unit. (i.e. radiant heat or a boiler) The super insulation and air sealing aspects of this house will allow it to use 90% less energy to heat and cool it with. I’m hoping that the Hobbit House aspects of it will make it even more energy efficient.
Thanks for stopping by and writing!Looking forward to your next comment.
Jim
Hi Jim,
I’m still tagging along and loving the progress. Your hard work is paying off.
I saw this today and immediately thought of you – https://stamps.nzpost.co.nz/personalised/stamps.
I’m sure you have lots of use for a NZ stamp 🙂
AJ
Aj! Thanks for writing! I checked out the stamps and they really are pretty cool. New Zealand really went with the Lord of the Rings theme in a big way.
I’m glad you’re still following along. Hopefully this winter won’t be as big as a bust as last years was. The snow really took a toll on me. (More mental than physical)
Glad you’re enjoying the blog and I really do appreciate your input!
Thanks again!
Jim
Jim,
In my part of the world (Dallas, Texas), all of the new houses are built on slab foundations — no basements — so all of the plumbing is done before the *foundation* is poured. They set up the form boards for the foundation, do all of the prep for the foundation pour (like digging grade beams, laying out steel including post tension cables), and then the plumbers show up to do their rough in. While I’m not a plumber, there are a few things I have observed.
1. They usually use continuous flexible copper tube (up to 3/4″) for the water lines. This way there are no joints under the slab.
2. The copper is in a vinyl sleeve. This protects the copper from the corrosive effects of the soil and (more importantly) the concrete. Concrete and copper don’t like each other.
3. They leave the copper long enough that it sticks out of the finished slab by a foot or so. That gives them room to solder the rigid copper that finishes the job. They usually drive a stake in the ground and tie the pipes to it to hold them in place. The stake is left even after the pour.
4. Showers and tubs get about a 12″ hole formed in the slab to allow for drain traps, etc.
5. Around here, insulating the pipes in the ground is not that big a deal. It probably is in your neck of the woods, but I couldn’t tell you what sort of insulation to use.
You mentioned getting some help cleaning up outside, and looking at some of your pictures there is also quite a bit of cleanup to do inside. I see a lot of large rocks and/or chunks of concrete laying around. I’d get all of those out before you start on the plumbing. Otherwise you risk bumping the pipes while you do the cleanup. Right now, you could get in there with a bobcat and have the interior scraped clean in a few minutes. It will also save having to dig around all of those rocks.
Keep up the good work and the good writing,
Frank
Hi Frank! So glad you’re still out there keeping an eye on what’s going on.
Yeah, there’s a lot of work to do all over. Like I said I’ve scheduled the hired help for this weekend. We’ll see how much we can get done. (The forecast isn’t that great though.)
As far as the copper is concerned the well water comes in through a heavy duty black poly pipe and is run straight to a water tank. From the water tank it is piped through copper lines to the fixtures. Pretty simple.
It would be interesting to see how the plumbers do their under slab rough plumbing. I always find it interesting to see how guys do different things in different parts of the country. You can get some good ideas this way. I’ll be doing some of the things you mentioned. Boxing out for the fixtures is pretty standard. I’ll probably oversize my boxouts more than a regular plumber would. Just so I have enough wiggle room.
I recently visited a high rise construction site in Boston and they definitely had different means and methods than we have here in New York. Some of it was really interesting.
Just letting you know I appreciate you taking the time to write.
Thanks!
Jim