Moria…..You fear to go into those mines.
The Dwarves delved to greedily and too deep.
You know what they awoke in the darkness of Khazad-dum.
(Saruman the White on the path the Fellowship must now take.)
A demon of the ancient world awaits!
Hello again friends of Middle Earth and welcome to the latest installment of the Hobbit Hollow Construction Blog! Pleased to meet you and thanks for stopping by.
The Dwarves. I don’t know why but I’ve been thinking about them quite a bit as of late. Well, not quite a bit but a bit nonetheless. I really enjoyed Peter Jackson’s representation of the Dwarves in the Fellowship of the Ring. Their look, manner, and dwellings. Great miners and craftsman of the mountain halls. Ya gotta love the Dwarves.
The problem is I do think of these things. You know, Numenor, the Dwarves, Elves, the One Ring and the world being covered in a second darkness.
Donald Trump?
Okay Jim, let’s not get into politics here. Warning bells are starting to go off. It’s supposed to be a family friendly blog about building a Hobbit House. Not about politics or my personal struggle with dealing with my Mother-in-Law and how she stole my second oyster on the half shell when we went out to dinner the other night. Not at all.
Just a simple no-nonsense weekly blog. That’s all.
But I really am disappointed about how I handled the whole oyster thing. She pulled the old, “Oh, look! James Earl Jones just walked into the restaurant” trick. I turn my head to look and she grabs my fair share of the appetizer. Remember the cheshire cat from “Alice in Wonderland”? Remember the smile? Now you know why I just can’t let it go.
Okay Jim. Enough is enough already!
Anyhoo. I really always liked the lines from the movie that I quoted at the start of the blog. That’s really the only reason I put it in there. What can I do? I’m a Lord of the Rings geek.
Wow! What a difference a week makes though. Negative 14 last weekend, 55 this weekend. What’s going on? It was a pleasure getting back to business over at the house. I don’t think I’ve personally spent any time there since before Thanksgiving. I’m really going to have to refocus my efforts.
…..and I started doing that this weekend.
So as I have stated in the past the whole window framing thing is a bit of a mystery to me. I’ve never framed a curved window before and I’ve never built super insulated walls before either. So there are a wide range of issues that have to be dealt with when doing this kind of work which are considerable. Passive house issues being another consideration.
So one of the advantages I have in my favor is that the framing above the window does not have to be load bearing. What does this mean? The short version is that there is no structural load above the window that has to be transferred around the window. Hmmm. I don’t know if that helps. In other words, the shell of the Hobbit house is supported by the two side walls. The space above the window is only going to be carrying the framing that supports the drywall on the inside and the siding on the outside. I don’t know if that helps much either.
Bottom line is we don’t have to go crazy making a beam over the window to carry a serious load. Get it? Got it? Good! We’ll get to what I came up with in a moment.
So I’m on my own this weekend. Terence went to visit brother Ethan with brother Jude up at SUNY Cortland. I think they were going to a quilting bee or something.
So the first conundrum of the day was how do I lay the window down by myself to get a full scale layout. The window weighs a couple of hundred pounds and is seven foot six long by five foot high. On top of that it’s leaning against the wall in the wrong direction. So, before I can lay it down I have to spin it around and walk it away from the wall at least seven to eight feet. If this thing goes over I’m gonna wanna hit myself with a hammer. To make matters a little worse I have to lay it down on a piece of HDO plywood so I can do the layout. Actually what really made matters worse was there was a pretty stiff breeze blowing in from the south that wasn’t helping my situation.
Anyway I used a series of 2×4 blocks to set the window on and kept them within arms reach so I could keep a hand on the window while I put the next block where I needed it. The whole process probably took about a half an hour.
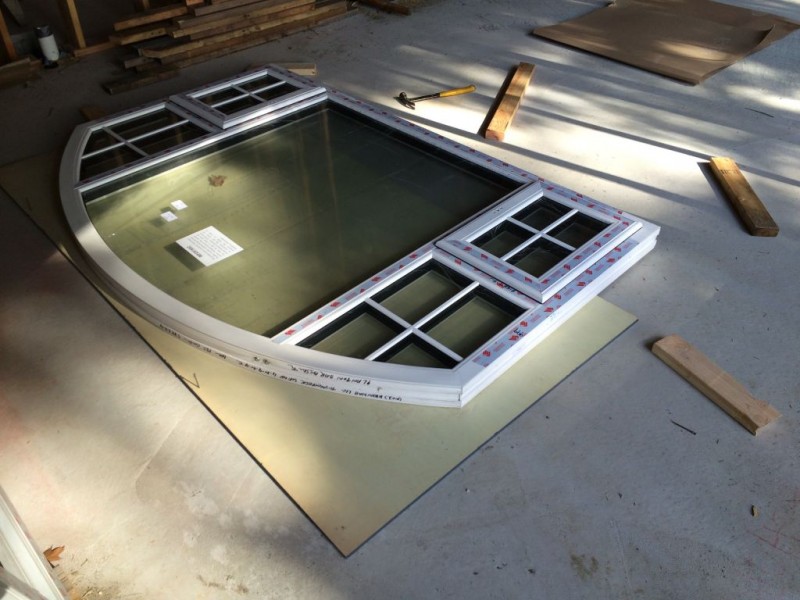
Once I had the window on the plywood I was able to slide it around and center it where I wanted it on the plywood. I secured the window to the plywood with some cleats and 2×4’s so it wouldn’t move while I was doing the layout.
The gist of what I have to do is this: I have to create a frame that stays approximately a quarter of an inch away from the window. This quarter of an inch gap gives me enough room to install the window and spray foam insulation between this gap later on to insulate it properly. The other issue I face is that it’s not a typical house framing job. In our case here we have to have the plywood that is forming the gap project beyond the window so that it will capture 4 inches of styrofoam that we are going to put on the outside of the house later on. So this is really confusing, right? So let’s not get to bogged down in details we won’t get to for a while.
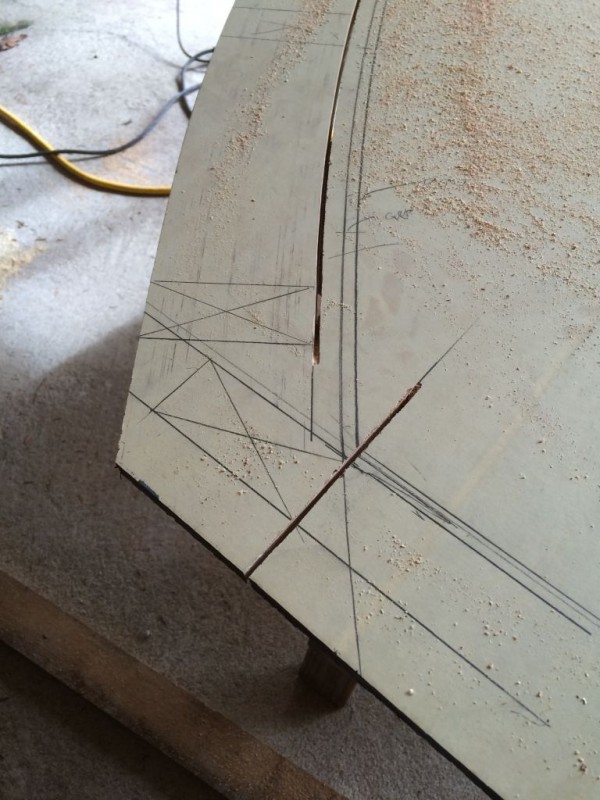
My main focus was to cut out a template to make a non-load bearing header for the window. Let me show you the layout first. That might help.

So as you can see what I did is use a series of different scribe blocks to get the exact curves I needed. If you look closely you can see that I scribed in the quarter inch air gap, the half inch plywood and then the depth of a two by four. On the vertical side I drew the air gap and the 2×4 stud which is going to support this header. What I forgot to do was show the 3/4 inch plywood that is supposed to go on the side of this 2×4. That was a mistake. I didn’t realize this until I was all done at the end of the day though. I have a way of fixing this but I’m not 100% sure I like the fix. I might just do the whole thing over again. Gonna have to mull that over.
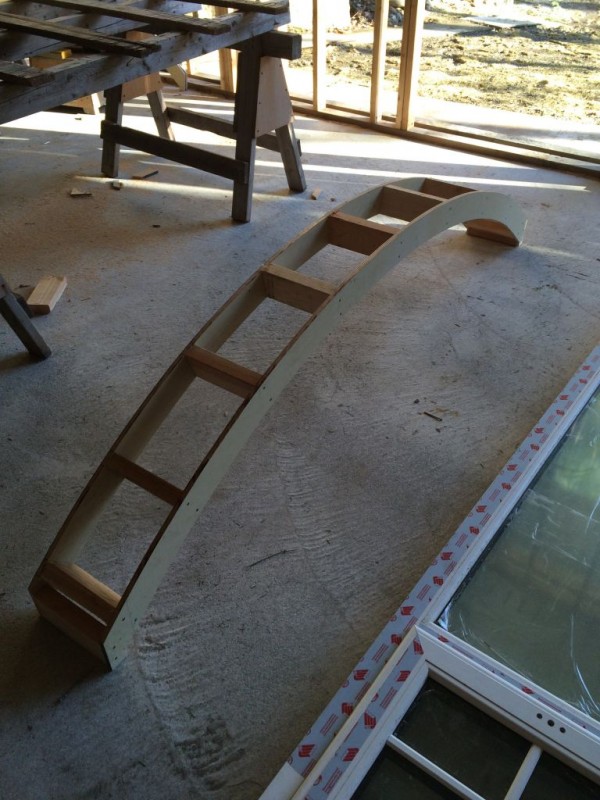
Once I had the layout done it was just a matter of pulling out the plywood I marked up and cutting out the template. I used a skill saw for most of it and a jig saw in the tricky spots. Check it out.

Once I had the first one cut I just clamped the template to the plywood and traced it out again. Each time I would label where the studs were going to go.
So this header is going to be the same thickness as the existing wall. So the wall is nine and a half inches thick and I have to sandwich a 2×4 between two templates that are 1/2 thick each. So I cut 2x4s 8 and 1/2 inches long to make it the correct depth. Actually I cut them a bit shy of 8 and 1/2. Gives me a little play later on.
After I had all the studs cut I have to nail the whole thing together.

All I did here was put one template down and then put the other one on top and nail away. The key was keeping the bottom 2x4s aligned with the bottom of the template. Here’s the finished product.
Once I was done with this I figured out the correct height for installing the frame in the exterior wall assembly. I cut this 2×4 out and installed the frame.

I hope this gives you an idea of what’s going on. So the next step is to secure this to the frame and then get the studs in above this window frame. Which is a little tricky, as well. I’m hoping to get to this next week.
I’m sure the Editor is glad this technical monstrosity of a blog post is over. But for all you technicians out there it’s going to get more interesting!
See you next week!
And watch out for little old lady’s pulling the old bait and switch routine on you!
Jim
PS: Had a huge rain storm here last week. Heavy wind and rain. I couldn’t believe how much water came in through the skylights even though they were covered. Tried to fix it this weekend. Put a full sheet of plywood over them and spray foamed underneath the plywood. I hope this works. We’ll see this week. Supposed to have a lot of rain again Tuesday through Thursday. Take a look.

Ηiya vеry cool website!! Guy .. Βeautiful ..
Wonderful .. I wіll Ьookmark your website and take the feeds
additionally? I’m satisfіed to find a lot of helpful
info here in the submit, we’d like develop extra
techniques on this regard, thanks for sharing.
. . . . .