I know what it is you saw, for it is also in my mind.
It is what will come to pass if you should fail.
The Fellowship is breaking, it has already begun.
He will try to take the Ring.
You know of whom I speak.
One by one it will destroy them.
The Elven Queen Galadriel speaking to Frodo after he has seen a vision of doom in her mirror.
The road to Mordor is long and difficult my friends. Anyone who thought that building a Hobbit house like the one we are working on would be quick and easy needs to reevaluate the time clock. Myself as well. Work is really taking a lot out of me these days. I did have a pretty good day at the house this Saturday I might add.
….and welcome to the Hobbit Hollow Construction Blog! I’m glad you stopped by. Had to get some Lord of the Rings trivia in there at the start. It feels like I haven’t done that in quite a while. I guess the line “What will come to pass if you should fail.” struck me as relevant for some reason. We’re way to close for that to happen. We’ve come so far already.
On a completely different note I have access to the statistical data for the blog site. One of the interesting items is a world map that indicates how many people from any particular country visited the website for that day. The other day I noticed an uptick in the overall volume and was wondering where these readers were coming from. Russia believe it or not. More Russians came to the website than Americans for the last two days. Interesting.
Okay so it’s not that interesting……but really. What’s up with that? Russia? Who would have thought?
Oh yeah and for the record I sent son Terence out to get pizza the other night and he actually gave me back my change without me prompting him. How refreshing. I wonder if he read last weeks post? I’ll have to ask him later today.
So the whole green roof thing is starting to happen. The grass just started popping out of the ground the other day. It’s too bad we’re getting hit by a cold spell right now because I think this grass is really going to take off once we get some warm weather. (It snowed last night over here and it’s supposed to get in the low 20’s Tuesday.) Let me show you a picture of what’s come up so far.
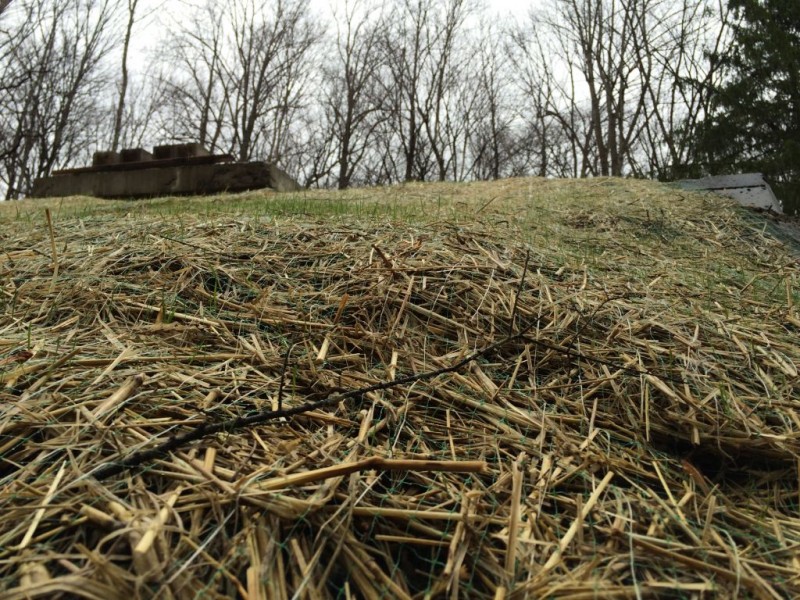
So this woven jute stabilization mat that my excavation guy put down really did the trick. I was so worried about erosion control over the winter and spring. The thought of having all the roof soil wash off over the course of the winter was something “in my mind”. We did get some serious rain here too. On the East side of the house where the hill comes down to meet the base of the roof I’m going to have to put some kind of drainage. During a storm the water really comes down the hill. I’m thinking of a stone swale. It’s got to look good and function correctly in a heavy storm. I’ll figure it out. I might have Terence and a friend do it next weekend. The sooner the better.
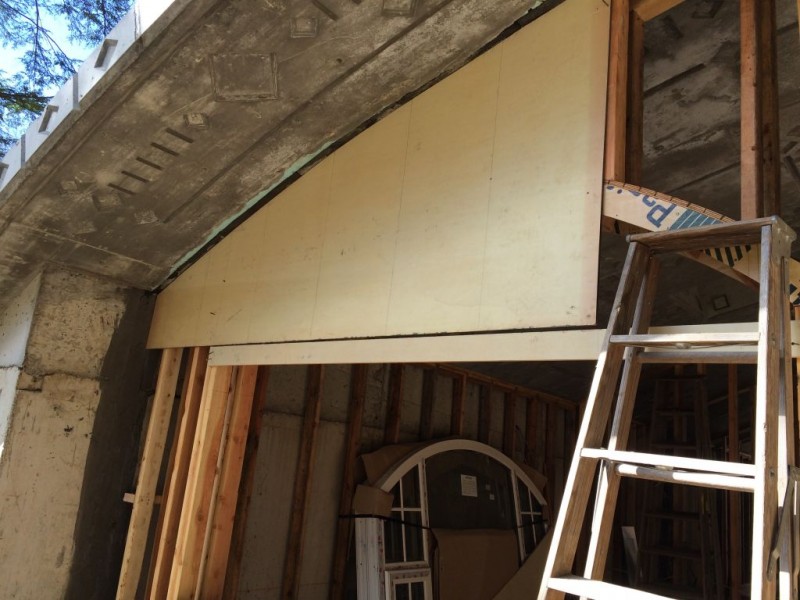
So as I was saying last week I really got the framing over the window arch down to a science. Let me show you the method to my madness.
The first step is to hold the 2×4 your going to use in place where it’s going to go and mark the two angle cuts right on the 2×4. Easy. After that you take your skill saw and cut through those two cuts as shown.

Once both cuts are done you lay the 2×4 down on the flat and mark the cuts all the way around the balance of the 2×4. This way you can make an accurate cut through the other side of the 2×4.

Installation is a bit tricky. So my concern was that as I was installing these short 2×4’s I would be pushing down on the arch and possibly change the arch dimensionally. Hmmm. That’s a mouthful so if you don’t get it that’s alright. Bottom line is as you are nailing these little 2×4’s in place things may start to move….and we don’t want that to happen. Hence, I brought in my friendly neighborhood banding wire. Let me show you what I did.

So I just used these 4×4’s to hold the correct dimension and then wrapped the whole thing with banding wire and tensioned it up. This way the arch will retain it’s correct shape as we are installing the 2×4’s over the arch.

So what I would do once I had a 2×4 ready for installation was hold it in place and then drill a pilot hole through the plywood mimicking the arch. Then I would grab a screw and force it into the hole hard enough so it would stay in place in the 2×4. Then I would grab the screw gun and drive the screw into the 2×4. Then I would be able to let go of the 2×4 with my left hand and nail off the rest of it with nails. Hmmmm. I think I probably lost a few of you on that one. Sorry. Needless to say you had to have everything set up a certain way or you wouldn’t be able to do it. Here’s a picture of where I installed the screw to hold the 2×4 in place.

Well, that picture didn’t help much did it?

It looks weird, right? Like it’s curved incorrectly. Must be an optical illusion.
So the other thing I worked on was the exterior sheathing.
Way back when, when I cut my original templates for the house radius I said to myself I said, “Jim you’re going to need these templates when you go to do the front and back sheathing! Make sure you put them in a cool dry place so you have them when you need them!” The boys threw them out when they were cleaning up. I had them labeled too! Luckily I did find one piece with the curvature I needed.
The piece that I found had the right curve but it was at the wrong orientation. Which complicated the layout considerably. Put it to you this way. Doing this kind of sheathing by yourself is not easy. What I did have to do was scribe the final cut so it fit right. Check it out.
After I scribed and cut the plywood I put it back into this position and scribed the window arch on the inside. Then it was just a simple matter of cutting out the window opening and nailing it in place.
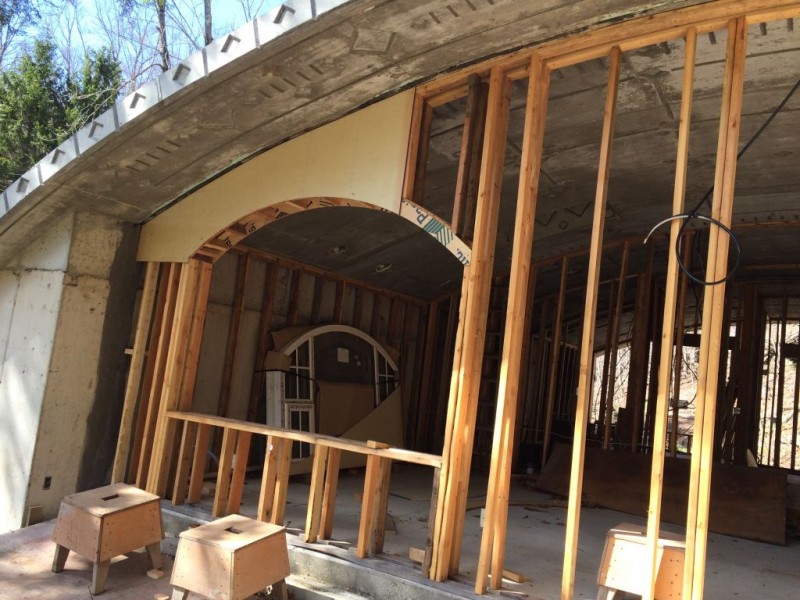
I also installed the front door framing on the inside. The door is a complicated matter on a lot of levels so we won’t go into that right now.
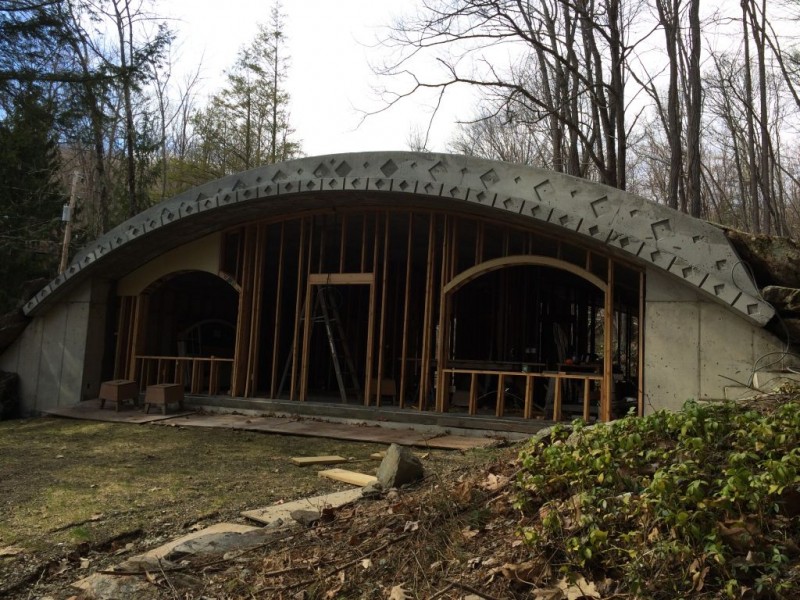
My hope is to get the front sheathing done next weekend. That would be awesome and it would really change the look of the house!
Have a great week!
Jim
PS: Jude stripped out some of the wood I left in the ceiling. The design came out pretty good.

At current exchange rates — 69,000,000 and change. 🙂
Jim,
Have you considered just sheathing over part of the window openings and then cleaning up with a reciprocating saw (AKA Sawzall)? It would save having to tack up the partially cut piece, scribing the window opening, taking it back down, cutting, and then re-installing. Instead, just scribe it to the concrete roof, hang it, and then run the reciprocating saw around the inside of the door or window opening.
Thanks Frank! I gotta make sure that Putin isn’t ripping me off when I start negotiations.
As far as the sheathing is concerned. Yes, I have done sheathing the way you’ve described in the past. Sometimes even with a chainsaw from the inside. These windows are a little different. In this case I wanted to make sure that I cut on the inside of the radius scribe line. This is to ensure that the plywood doesn’t project into the window opening at all. I hope in the next week or so I’ll be able to form the box that will encapsulate the window. For now I’m just being overly cautious because I’ve never framed a window this way before.
Thanks for writing and following!
Jim
Go Villanova! 31 years later, they win again!
Yeah, that was a good time that night way back when. I didn’t even watch the game. Way to tired and way past my bedtime.
Take it easy Mike!
Jim,
Thanks for da pictures this week 🙂
Looks great!
I think dem Russian visitors are hackers or maybe Putin is interested in what you are doing…..
Mike
Putin is going to have to go into his offshore bank account to afford this Hobbit House….Hmmm. Unless he makes me an offer I can’t refuse.
Jim
How many rubles makes $1,000,000?