Hobbit Houses and the Art of Motorcycle Maintenance?


Interesting. Yes? Let’s face it home maintenance is a drag. I’ve never really been a good home maintenace guy. That being said I’m not going to go on a rant about Zen and the Art of Motorcycle Maintenance. On the contrary, I don’t want to do any maintenance at all. (I tried reading that book but really struggled with it. I guess I’m never going to be a Zen Buddist.)

So now that you know that I’m not such a great maintenance guy let’s get back to maintenance and Hobbit Houses. This topic all came to me when my master bath toilet sprang a leak last Monday. It’s summertime  and sometimes your toilet sweats and me being a low maintenance kind of guy I happened to notice that this toilet seemed to be sweating  quite a bit this summer. (Just so you know this particular toilet never really sweated in previous summers.) Ok so the toilet is sweating away. Then on Monday I noticed a small puddle on the floor next to the toilet.( Maintenance man senses are tingling.) I look under the toilet and see a stream of water coming out from the bolt that attaches the bowl to the tank. I’ve never seen a toilet leak from this spot before but here we go. Anyway the short version is it took me till Sunday to get around to fixing it. It’s a long story but  lets just say there were complications getting the bolts out etcetera and some of my plumbing tools were broken.(The little hacksaw blade with the plastic handle). One day after work I tried fixing it but began to sweat profusely so I canceled and had butter pecan ice cream with whipped cream and two cherries.(With a little extra cherry juice on top). So I guess you’re wondering what this all means?

Well one of the aspects of this particular Hobbit house is that it will be a relatively low maintenance home. The structure is reinforced concrete. No rotting or deterioration.  It should last about 1000 years. The roof is going to be vegetation. Just let whatever you plant grow and grow. No reroofing to worry about or gutters to clean. The small amout of siding that exists will be sheltered by the roof eaves and is only one story high.If you do want to repaint you’ll only need a step ladder. This particular Hobbit house will also have stone veneer siding as well which is totally maintenance free. Another huge aspect of this Hobbit house is that it will not have a conventional boiler or air duct system. The Passive house aspect of the home (Superinsulated and air tight) eliminates the need for a large conventional type boiler. No oil deliveries and yearly maintenance checkups on your boiler. All we are going to put into this house is what they call a ductless minisplit heat pump. This will provide your winter heat and your summer air conditioning. Where’s the hammock?…Lets take a nap!

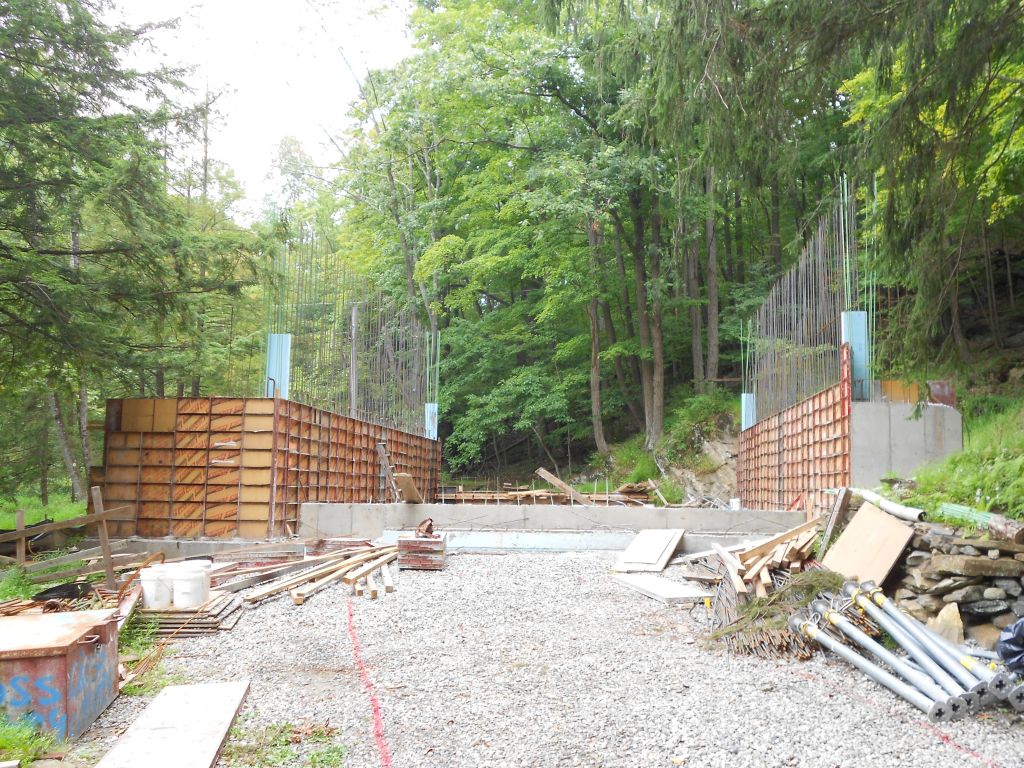
The other reason I was thinking about maintanence was the stripping of the concrete forms which we started in earnest this Labor Day Weekend. I mean when you see these walls it’s just like a thing of beauty. Who has 16 inch thick concrete walls for their home?  Its gonna take an M-1 Abrahms tank to knock this thing down. When I see concrete like this- it’s just like we’re never going to have to worry about this. Ever.

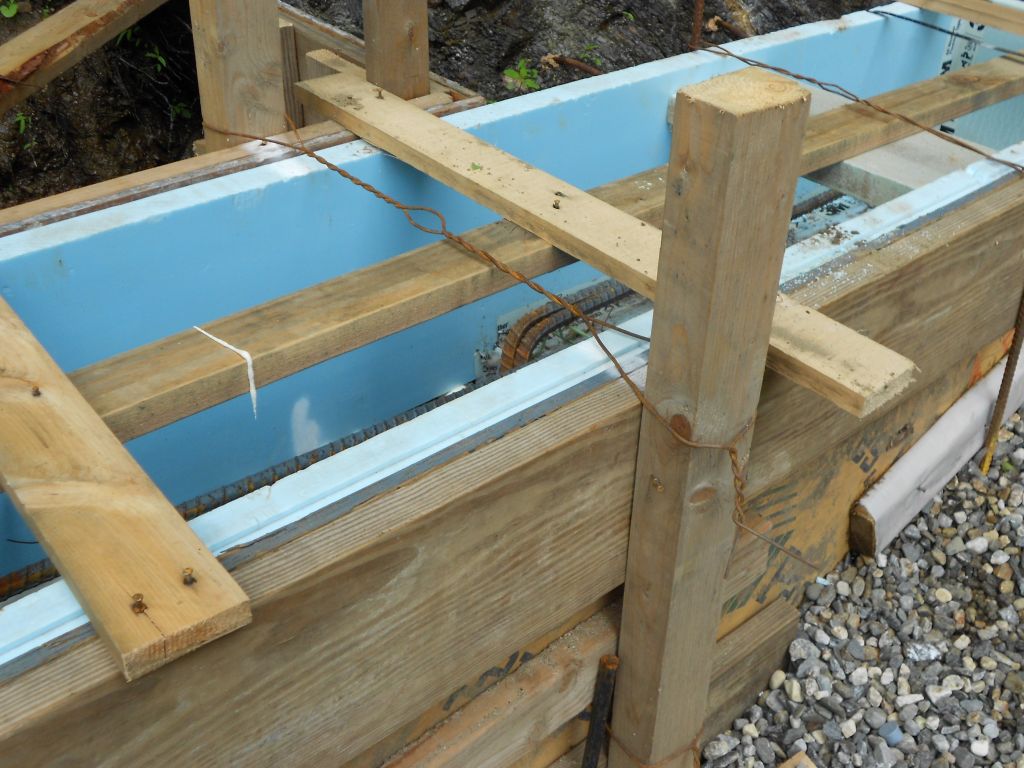
So I got started Saturday around 8 AM. Stripping is pretty simple. Begin where you finished, end where you began. More or less anyway. It can get a little tricky depending on the complexity of the formwork. But this was pretty straight forward. First order of business was to strip the top waler off and any form ties that were above the scaffolding. After that I took down the 2×4 protection and the planking. Here’s a picture.

Walers and scaffold stripped off.

I don’t know how it was over the weekend in your neck of the woods but over in New York it was disgustingly humid. I mean all you had to do was start breathing and you were sweating like a pig. Thank goodness I put in good drainage around the perimeter of the site. With the amount I sweated I think I would have washed most houses right off their foundations.

Forget about P90X, the Cleanz, Weight Watchers or whatever else you’ve been doing to lose weight. And totally forget about the gym.Stairmasters, treadmills,free weights. Just come to the Hobbit house and help me strip symmons forms and you’ll have the workout of a lifetime. Symmons forms weigh in at about 90 pounds. Move those suckers around all day and that is one hell of a workout. I was a mere shell of a man by the time I finished on Monday.

It is fun to see what is behind the forms though. I was especially looking forward to seeing how the retaining walls came out. If you remember we had some trouble getting the concrete to flow into this area during the pour. I was really happy with the way it came out. Check it out.


Retaining wall stripped.

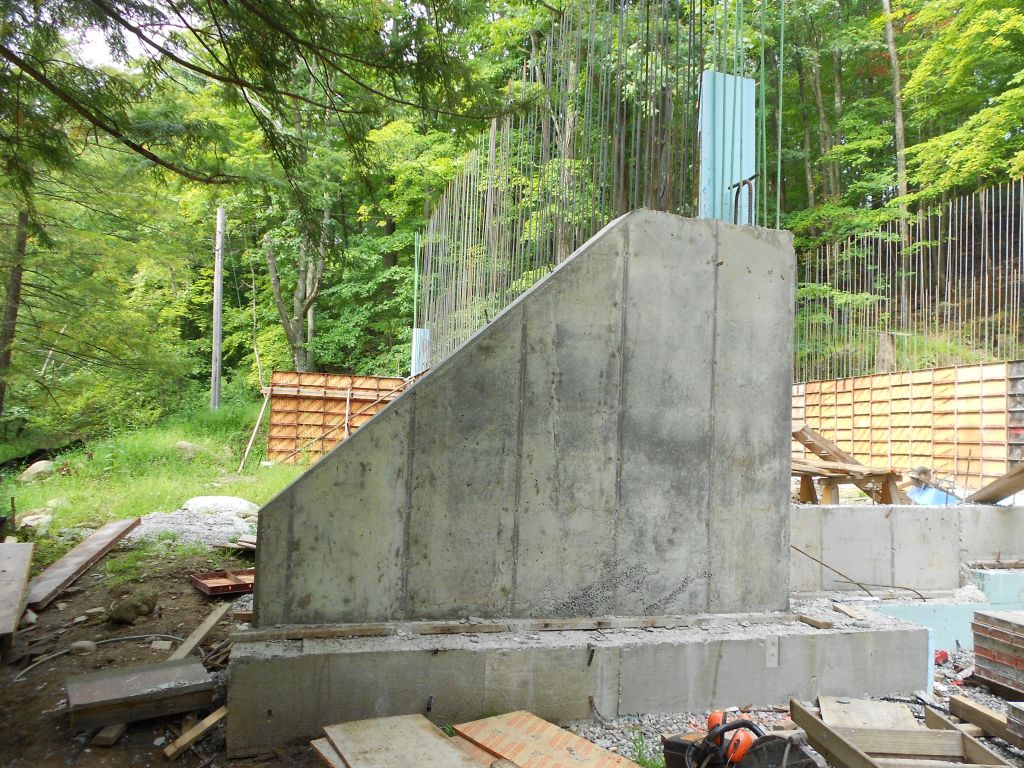
You have to look really close to see the joint where we poured the two lifts of concrete. The boys did a really good job.

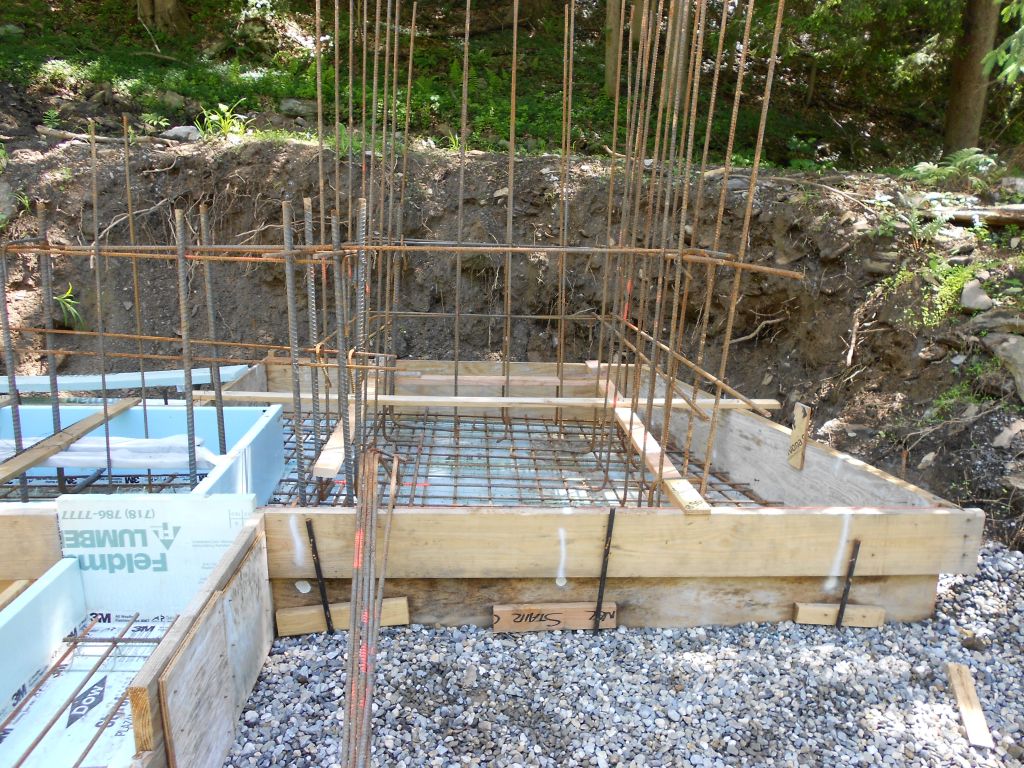
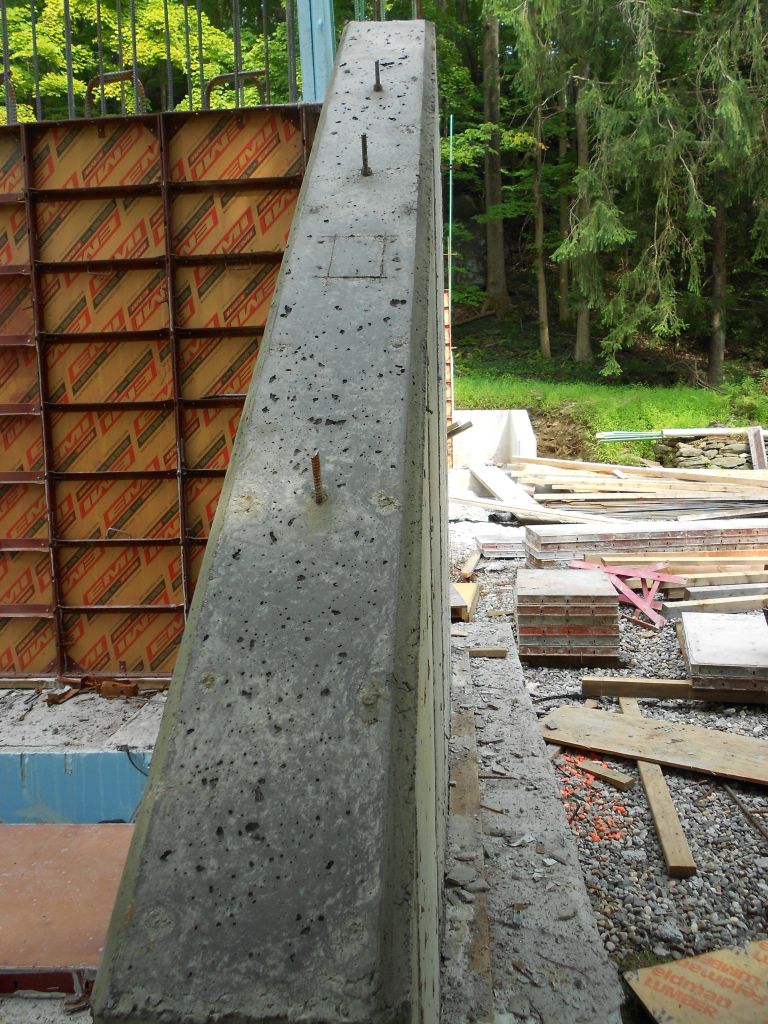
One of the things I was worried about was air pockets at the top of the form here at this particular location. You might not think that air would create a void in the concrete but it does all the time. That’s one of the reasons you need a good vibrator man on a concrete job. But at this location it was hard to get the vibrator underneath the top form. So I drilled 5/8″ air holes 16 inches on center into the form to let the air out as the concrete filled up the form. I don’t know if you can see it but there are only very small air pockets in the topface of the retaining wall. Check it out.

Top face of retaining wall

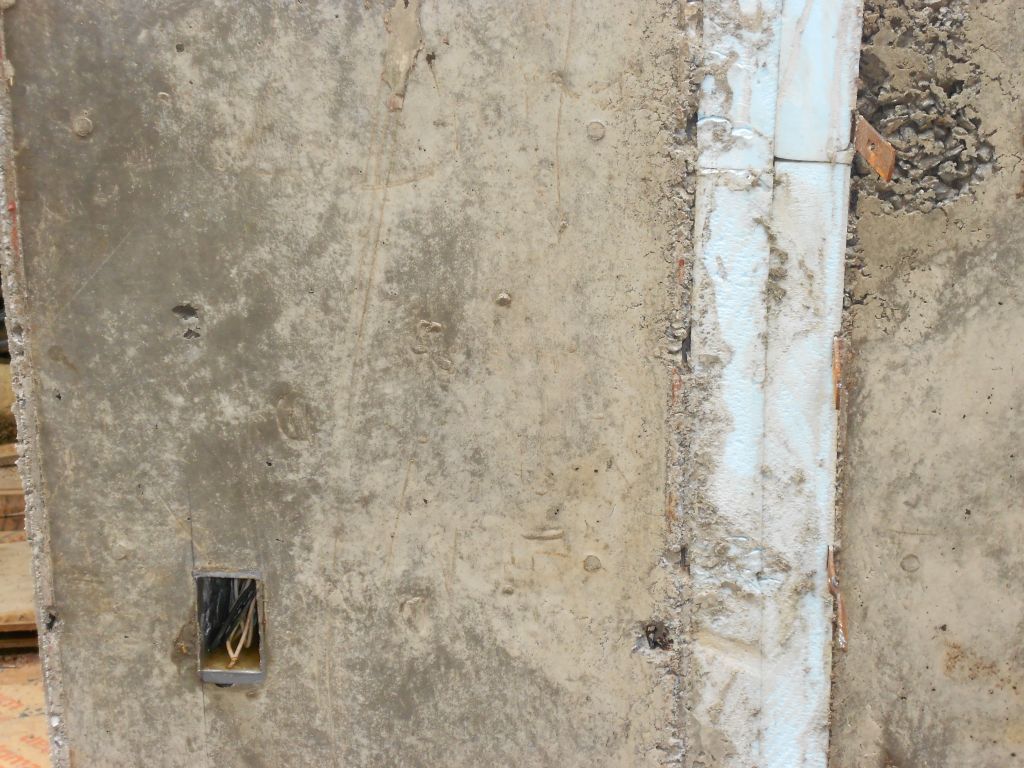
If you look closely at the above picture you will see an outline of a little rectangle. I cut out that rectangle in the form to allow the vibrator to go into the form on the first lift of concrete. Once the concrete filled up to that opening we stopped and I screwed the little plywood block back in place. Hmmmm…smarter than the average concrete guy wouldn’t you say! The skewbacks on the edges were a nice touch too.

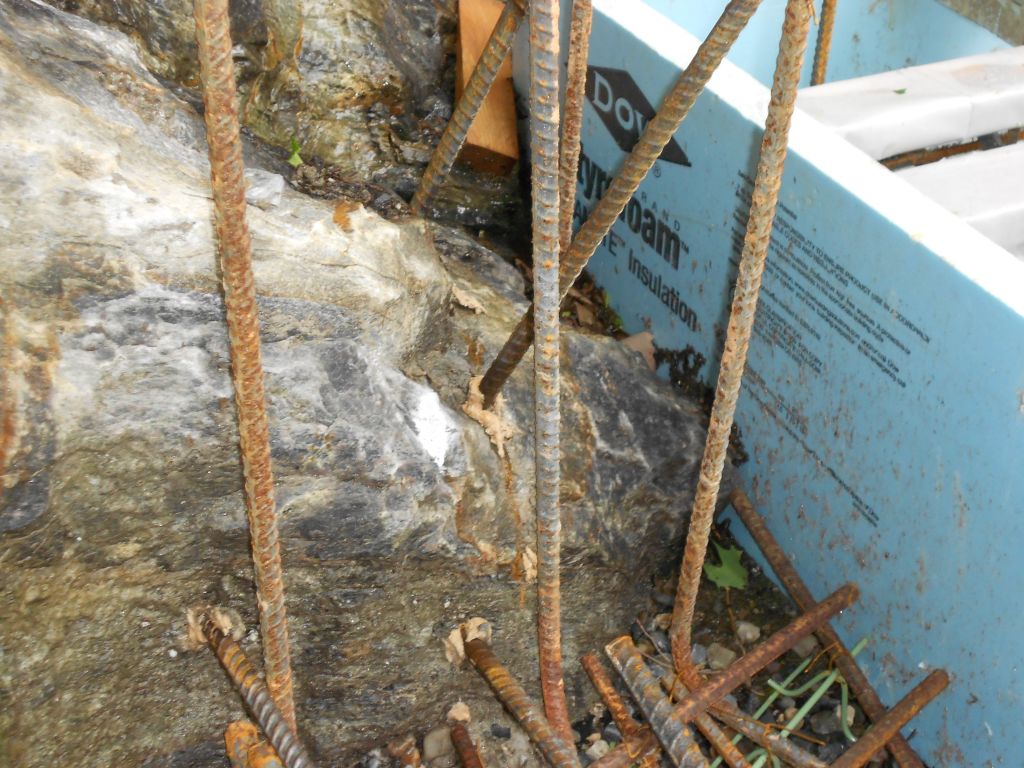
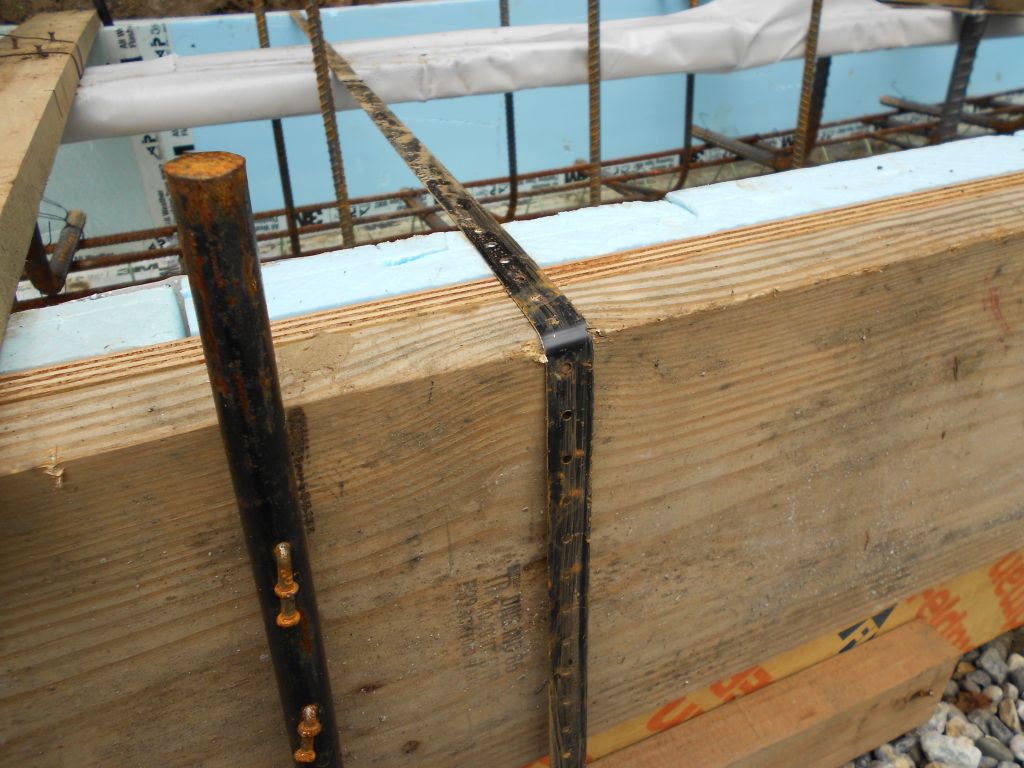
Ok I did forget one thing. I forgot to check all of the locations where I had the 4 inch styrofoam for our thermal break. I was supposed to tell the guys while we were pouring to put a little concrete on each side of the styrofoam. This will equalize the pressure on the styrofoam so we don’t have a blowout. I actually put a form tie 6 inches from the bottom to prevent this from being an issue but I forgot one corner. Look what happened.

Styrofoam moved during the pour at the very bottom of the form.One location only.

We got lucky here. The styrofoam didn’t break so our thermal barrier is still intact.Whew! It just goes to show you how important the little things are in a concrete pour. Oh yeah check out how the electrical boxes came out. This was sweet.

Exterior electrical box and thermal break at exterior wall assembly.

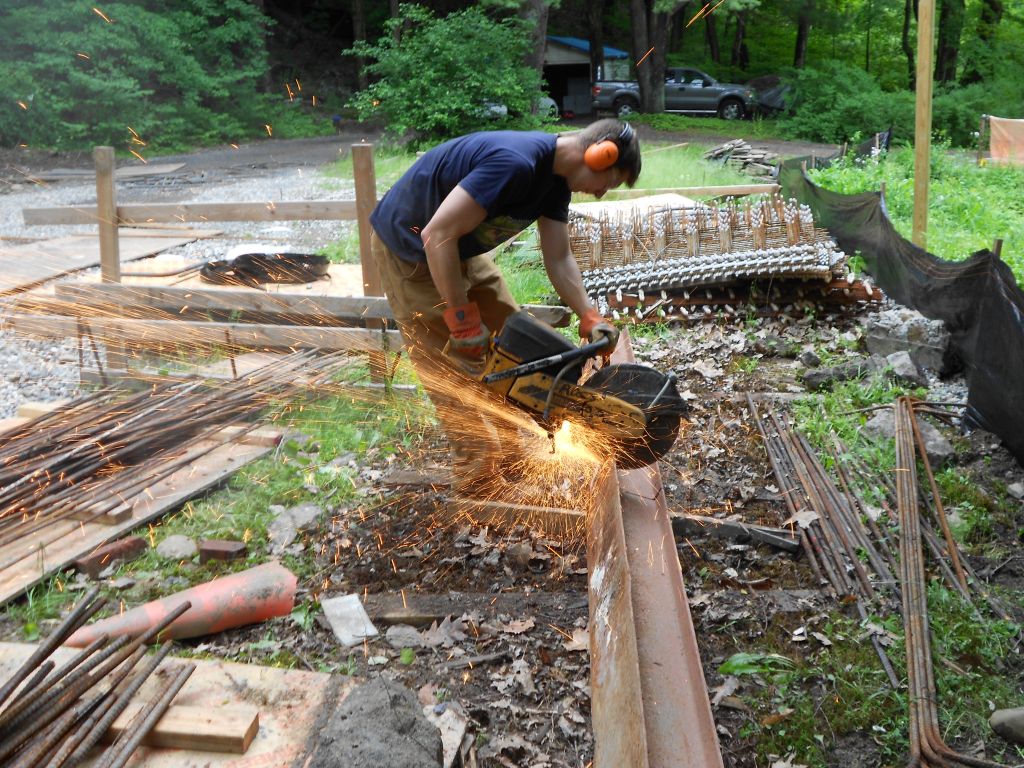
Jude had a football scrimmage Saturday and Terence was at a friends so I didn’t have any help. I asked Jude  if anyone might want to work for two hours on Sunday popping pins out. He got a hold of RJ and they both came over Sunday at 11. It was great.There are literally thousands of pins that have to come out and it is time consuming and hard work to boot. You have to remember all the pins are now in tension after the concrete has been poured so you really have to bang the pins hard to get them out. Here’s a picture of them working away.

Rj and Jude popping pins out Sunday morning.

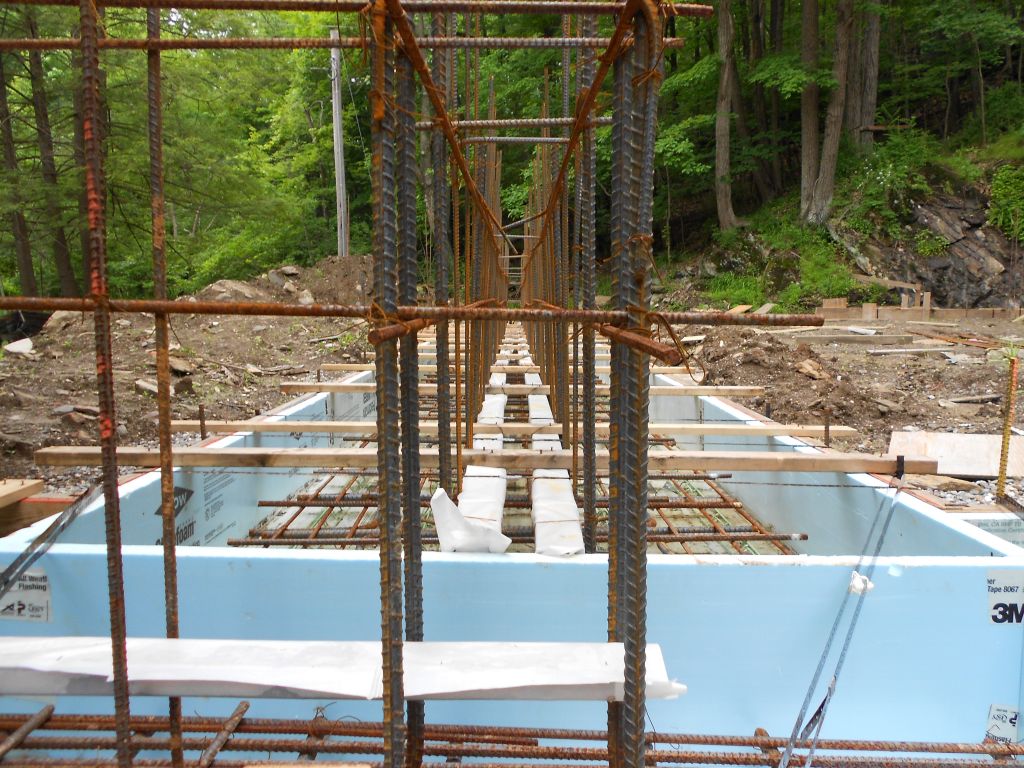
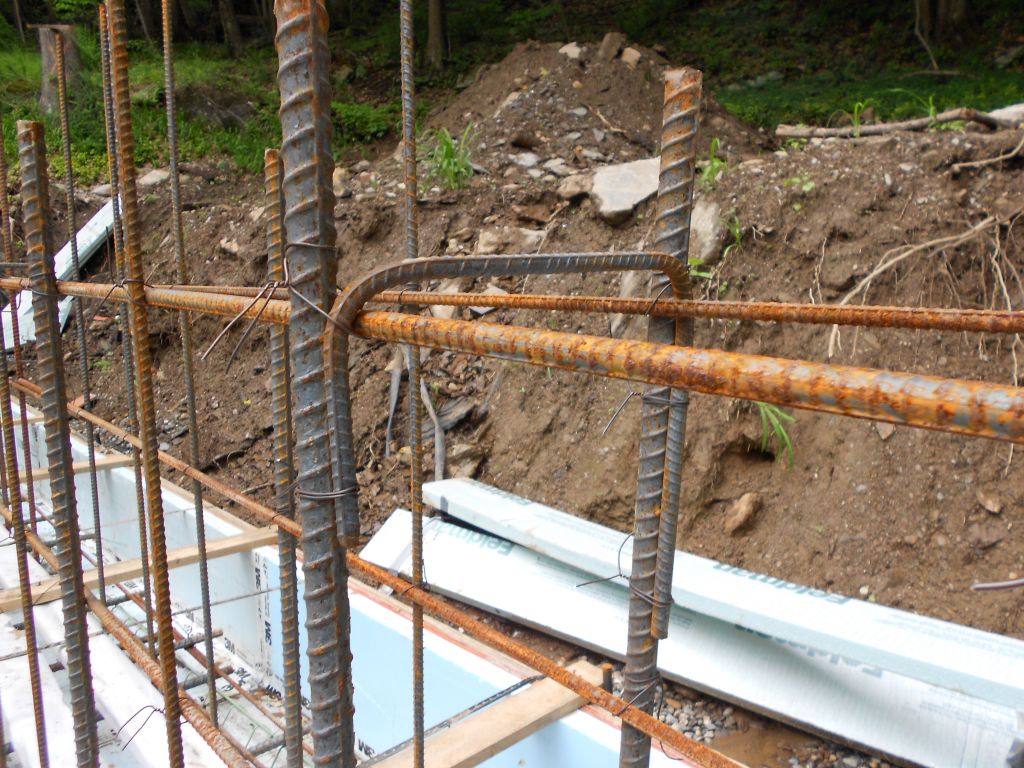
We got a lot done Sunday.Here’s a picture of the Northern retaining wall before I stripped off the top form. It kind of gives you a better idea of what we did at this location.

Norhern retaining wall before the top form was removed.

So the big picture this weekend was to try and get all the wall panels off and stacked. This way next Saturday we could load out the truck and get all these forms off the site and move onto phase 7 b of the project. I knew that was a tall order so I decided to just try and get the panels off. I figured if I did that I could probably stop by after work and stack panels for a half hour to 45 minutes a night. This way we would be ready for Saturday trucking.

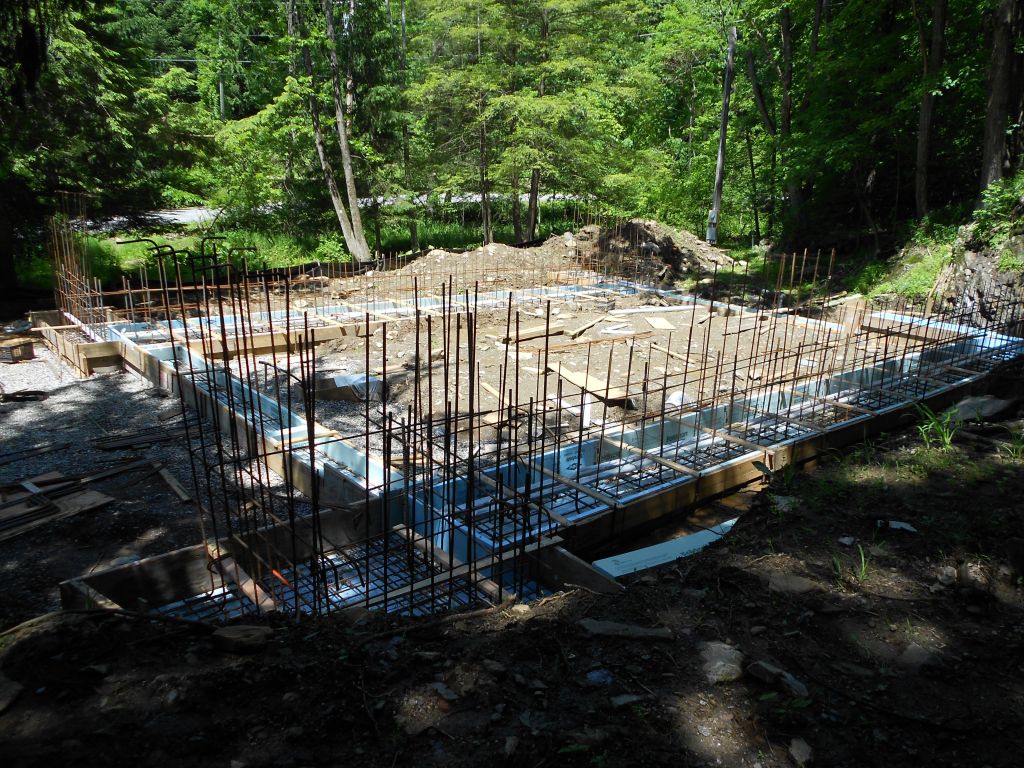
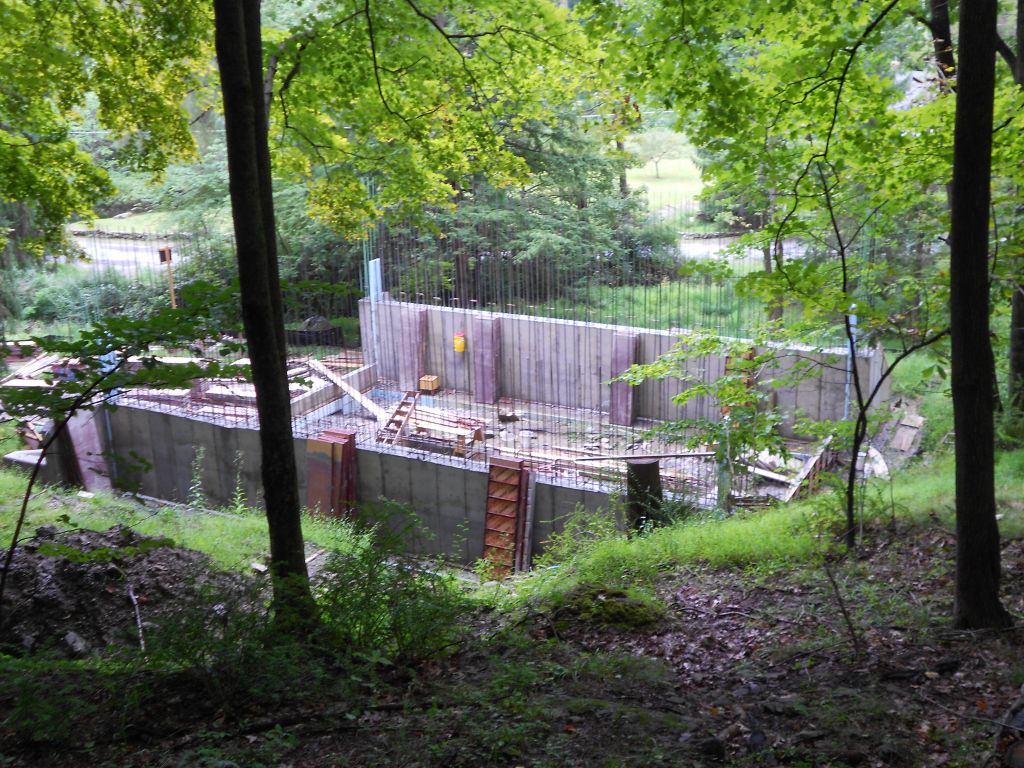
I employed Jude and Terence Monday for about an hour popping pins and that was the trick. We’re all ready for next weekend….well almost.Here are a few pictures with all the forms off.

End of the day Monday

From the bridge.

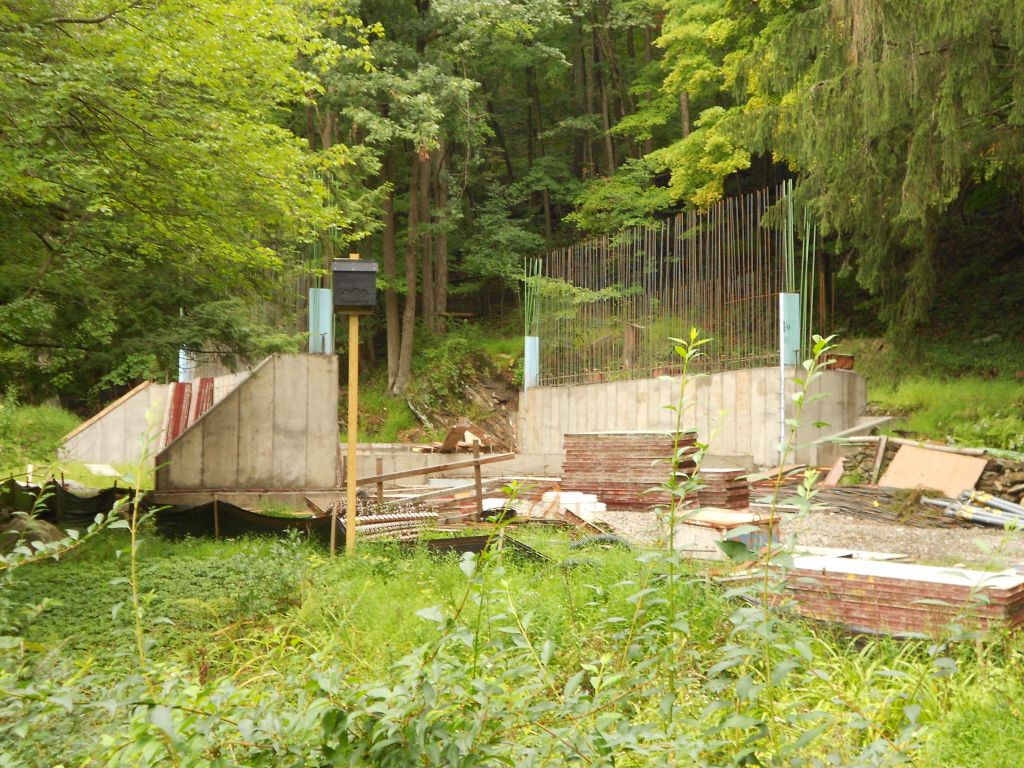
I’m sick of looking at these forms though. I can’t wait to get rid of them. Which brings me to another conundrum. Who’s going to help me put these panels on the truck? Jude and all his football player friends start playing next Saturday. Lightweights need not apply. This is heavy work so I just can’t use anyone. We’ll have to scour the Shire for some help. I’m sure we’ll find some. Hobbits are quite strong actually and are always up for a good days work as long as they’re well fed.

Enjoy your week!

Jim


Ready, Set, Pour….Oh, Noooooo!

“It’s a dangerous business going out your door. You step onto the road and if you don’t keep your feet there’s no knowing where you might be swept off to.”-Bilbo Baggins. The concrete business is a dangerous business…I hope I’m being swept in the right direction.

I met the building inspector Thursday afternoon at 2:15. I had to leave work early but this was the latest appointment I could get with him. It wasn’t too bad work wise because we had gotten rained out around 10:00AM so I really didn’t have to be there for anything special. I got up to the site around 2 and had a bunch of things I needed to finish for the pour anyway so I got set up while I was waiting for the inspector.

The inspector arrived promptly at 2:15 and proceeded to walk to the edge of the site. He turned and looks at me and says, “It looks like you know what  you’re doing, pour away.” That was music to my ears. The final step before pouring is in place.I also asked him about the under slab plumbing. Did it really need to be cast iron pipe under the slab? He said no and that I must have gotten an old checklist from the building department. More music to my ears. That would have been such a pain to take on a cast iron job. At least for me it would have been. If you make a mistake with PVC you just cut it out and reglue a new piece on.

Once the building inspector left I really got into it. I started finishing off the little things I needed to do before this Saturday’s pour.I called the concrete plant and set up concrete for 8AM Saturday and called the pump company and set them up for  7:30. It takes about a half hour to prep the pump before concrete arrives.

One of the things that I really wanted to do was lock up this area where there is a step in the footing. I used #9 wire at the top of the footing and through the footing about 9 inches off the bottom. I put 3X4 stongbacks on either side of the forms and wrapped these with the #9wire. Once this is done you take your handy dandy lineman pliers and twist the #9 wire to tighten it up. Here’s a picture.

# 9 wire twisted to hold 3X4 strongback.
# 9 wire twisted to hold 3X4 strongback at step in footing.

The other thing I did Tuesday after work was pin the rock where it’s exposed to the footing. I didn’t have my camera that day but basically what you do is take a Hilti drill with a 3/4 inch bit on it and drill 8 inches into the rock. Once the hole is drilled you take a vacuum blower and blow any dust that is in the hole out. I brought a tube of Hilti HY150 epoxy with me from work and using the dispenser for it you squirt the epoxy into the drilled hole and insert a #5 bar. On a warm day the stuff sets up in less than a half hour. (You can use non-shrink grout in lieu of epoxy.The epoxy is a snap though) It was raining when I did this so I just did one hole at a time. I also epoxied some 1/2 inch coil rod in place as well. I used the coil rod to help brace a couple of the forms for safety reasons.Here’s a picture.

#5 bar pinned into the rock using Hilti HY150 epoxy.

By the end of the evening on Thursday I was pretty much ready for a Saturday pour. I had about two hours of work left to finish things up which I was planning to do Friday night or early on Saturday.

Forms ready for Saturday's pour.
Forms ready for Saturday’s pour.

Then something happened on Friday that was most unexpected…and also quite unusual. We lost power to the placeing boom at work while we were pouring.This is a placing boom.

Placing boom: Concrete is pumped up the building and placed with this machine.

We actually lost power to the placing boom right before we started to prepour the columns on this job. As soon as I heard that I called the plant and told them to stop shipping concrete until they hear back from me. That part was fine. They had only shipped the grout truck that’s used to prime the pump and two ten yarders of 5950 psi concrete aka 5950 (pronounced fiftyninefifty in the business if you want to sound like you know what your talking about.) The electrician foreman Tony was working on it already so that was great and Johnny aka Johnnie Chiz, aka Chisel,aka Super Chiz was with him monitoring the situation. There was an electrical connection on the 15th floor that had gotten “fried” because water had run down into the fitting during the rain storm the day before. There was a slightly heated discussion about whose fault it was for not leaving a rain loop in the line but we were able to get past that. It took about twenty minutes to fix it and we were back in business and started to pump the concrete up the building. I called the plant back and released the balance of the concrete for the day which was only seventy yards. I also reminded them to put retarder in the last truck because it takes a while to clean out the line once you’re done pouring.( Retarder in a concrete mix slows the set time of the concrete once it is mixed. We use this in the summer all the time.)

Placing Boom 101:

For the uninitiated the concrete goes into a hopper in the street and gets pumped into a 5 inch riser pipe that goes straight up the building into the placing boom turret and into the placing boom itself. When you finish pouring you put a round sponge into the tip of the placing boom and blow it back down the riser pipe with compressed air into a box in the street. This cleans out the pipe for the next pour and you wind up with a box full of concrete that gets thrown out the next day.

What happens to the placing boom if the concrete starts to get hard? That’s when trouble really begins.

And things cease to be fun.

This is the short version: We lost power to the pump when we were almost done pouring 60 yards. The electrician was on it right away. He was on the deck. I met him on the 13th floor.”I found the problem and it will be fixed in ten minutes.” OK. You should have power. We still don’t have power. ..Let me try something else. It’ll take 5 minutes. I call Johnny Boo and tell him we have to get ready to move fast if this doesn’t work because the concrete is going to start to set up in the line.The next thing Tony the electrician tried didn’t work either. The placing boom can’t move we are totally screwed now. I waited too long to make a move. So much went on in the next half an hour I could write a book on it. (I keep forgetting that this is the short version.) When we went to blow back the line they couldn’t switch the diverter valve over.( The diverter valve is used for the blowback so the concrete goes into the box I mentioned before.) I broke open the line in the street before the diverter valve and the concrete started to come out of the line like 5 inch diameter sausages two to three feet long.(It really did look like sausage albeit concrete sausage) The concrete really started to pile up. I thought we were going to be a able to clear the line. At that moment I thought we were going to be fine.

Why didn’t the sponge ball come through at the bottom? Because the concrete in the boom never moved. The concrete that I had gotten in the street was all from the 22 stories of concrete in the riser pipe(It was a lot of concrete). Gravity had forced it all down the line.  The last position of the boom was completly horizontal. The worst possible position. We lost the boom. We were doomed. I couldn’t believe it. We were done, finished, game over. What a mess. I called and cancelled  the footing pour for the Hobbit House for Saturday. To say I was upset is an understatement…so were my wife and kids.

Saturday was spent taking the boom down to the street replacing all the lines and then reinstalling the boom. It took six hours. There were a couple of gliches during the day but we got it to work and everything seems to be OK. Here are some pictures.

Sending the placing boom into the street.
Sending the placing boom into the street.( Freedom Tower in the backround.)
Replacing the pipe on the boom.


Reinstalling the placing boom on the turret.
Reinstalling the placing boom on the turret.Johnny “Deck” signaling with Jeff the Hick assisting.

Well, we are ready to rock and roll for next weekend. Hopefully the weather will cooperate! (And my day job will go a little more smoothly!)  Enjoy your week!

Jim


Bilbo’s Trolls Arrive.

Most  of  you  have seen “The Hobbit.” Remember the three trolls who stole the ponies? If you do, then you’ll understand this a bit better. If you haven’t seen the movie, imagine the ugliest guy you’ve ever seen and make him about 12 foot tall and 900 pounds. With bad manners as well…and bad breath too.

Bilbo’s trolls arrived today. They put me in a sack, tied it to a tree and then proceeded to use it as a human punching bag. This went on for approximately 8 hours. That didn’t really happen but that’s what I felt like after tying rebar all day Saturday. Man am I beat up. I’m just not used to that type of work. I crawled home and took two ibuprofen. I didn’t finish but I’m getting closer.

Ethan helped me out today. Actually quite a bit. He cleaned up and spent about 2 hours cutting  the odds and ends rebar I needed. He also cut up this I beam that I forgot to get rid of  when we demolished the original house. We’re going to take that and any left over rebar scraps to the scrap recycling center up in Wingdale. Hopefully we’ll get a few bucks for the stuff. Here’s a better picture of Ethan using the demo saw.

Ethan cutting up an I beam for scrap.

We got a visit from our first tropical storm of the year. Andrea raced up the East coast this week. We took some heavy rain Friday into Saturday morning. By the time I got started it had all cleared out. Thank goodness. Earlier in the week it was predicted that it would rain all day Saturday into Sunday, and I almost started to cry. The strean and waterfall were really raging. I got to thinking about water wheels and hydroelectric turbines. The site here isn’t well suited for solar power but maybe hydro power will work. It would be pretty cool  to generate your own electricity. I mean look at this waterfall. There has got to be a way to get power out of something like this.

Waterfall after tropical storm Andrea had passed by.

I talked to Brian and Tim (aka “The Flash”) about fixing the wall rebar so it stays in place better.These guys are the wire lather foremen for the company I work for. They made up some U’s to spread the top of the vertical rebars. It worked really well. It  helped spread the vertical rebars the proper distance apart. This way when we go to stand up the verticals for the walls later on everything is in the right place. I put them about 8 foot on center. Here’s a picture.

Rebar U's help spread the wall dowels apart the correct distance.
Rebar U’s help spread the wall dowels apart the correct distance.

I was by myself all morning and one of the things I had to do was tighten the banding wire around the East footing form. Like I said this stuff when it’s tensioned is super strong. This picture shows the banding wire biting into the footing form.

Banding wire tight to footing form.

I have about 4 hours of rebar work to do. I’m hoping to get it done Sunday. Even if I get done, I still have to come back Monday to pin and epoxy some rebar into the rock on the Northeast corner before I can call for an inspection. I forgot the Hilti drill at work on Friday. Would you believe I brought that Hilti drill home the last three weekends in a row and never used it? Oh well.

Sunday: My wife is so sick. She has some sort of 24 hour bug that she thinks she got at work. Everyone else is fine though. I hope she gets better soon. I miss her and the happiness she brings into the house. I wish I could do something for her. I thought she would be feeling better by noon on Sunday but she really doesn’t  seem to be much better. 

I went over to the house early today. 5am. I slept on the couch so my wife would have the bed to herself while she was sick. When I woke up I knew I wouldn’t go back to sleep so I just figured I would go to the house and finish the rebar up,  which I did.

What I had to do was install the rebar for the retaining walls at the corners of the Hobbit house.The one corner was a little tricky. It also encompasses a retaining wall for a set of stairs. The picture is a bit confusing but the stairs are going to go up the side of the house to a small side yard at the roof level. I think I’m going to put a grill up there someday. There’s quite a nice view of the front yard as well. See if you get it.


Corner retaining wall rebar for future set of stairs.

For those of you who are familiar with commercial construction you might have wondered why I was using such heavy rebar. The drawings for this design pretty much call for all #5 rebars in the footing mat as well as the verticals. I used #8s because I got them for free. There was a mistake on the job I was on and all the #8 rebar had to get replaced with epoxy coated #8s. Tons and tons of rebar had to get taken out. What we could reuse we did but all the Z-bar #8s were going to get thrown out so I took them. I had Ethan cut them up for straights and L-bars. Believe it or not the Z-bars actually worked perfectly for the step footing rebar detail.

Z-bar detail in step footing.

Here’s the site at the end of the day Sunday.

Rebar nearly done.
Rebar nearly done.

I’m hoping I can leave work a little early on Monday. I really need to take care of the rock drilling detail before I can call for an inspection.The traffic from Queens is horrific but last Monday wasn’t so bad. If I do the drilling maybe I’ll add it to this post. Next weekend I would really like to pour this foundation. I need to schedule a concrete pump and concrete delivery for next Saturday. I have to set that up by mid week if I’m going to do it.

My editor is sick in bed so we’ll have to chaulk up any mispelled words or run on sentences in my column this week to me. I love my editor…get well soon!

Jim


The Pass of Caradhras: This Little Thing.

Welcome! I”m glad you stopped by again. I hope everything is going well in your part of Middle earth. Yes, the Pass of Caradhras. Do you remember that scene from the Fellowship of the Ring?  We’ll talk about that a bit later. Apologies for the delay of this post as well. I worked all day Saturday and part of Sunday on the  foundation.  I started the post sunday but then this site crashed and I’ve been busy at my day job ever since. This Saturday my wife and I and our two oldest sons went to look at colleges. So I’ve been “delayed” as Gandalf would say. (Having trouble adding  pictures for this post as well. Will add them as soon as possible)

So here we are about to start digging the foundation. I had a carting company drop off a 20 yard container to put the slab concrete into and rented a Komatsu Pc 138 excavator with a hydralic hammer. Here’s a picture of the site before I got started.

Breaking ground: Hydraulic hammer to break up concrete slab

I had the rental company put the hammer on first so when I got there on Friday night I would be able to chop up the slab while it was still light out. This worked out great.I think I was pretty much done in about one hour.  I’m thinking this is going to be a home run. All I have to do is take off the hammer and put the bucket back on and I’m going to be good to go! The guy from the rental company said that the PC 138 is equipped with a “coupler”.  And I quote ” The coupler makes it easier to switch out the attachments”. Did you ever notice when someone says something like that  it never seems to work out the way they describe it. Well this is one of those times. I even You Tubed a video on changing  a bucket with a coupler Friday night after I got home. They just showed a guy hooking one up though with no nuts and bolts explaination so I knew that wasn’t going to help.

Saturday morning  6:30 AM I begin the dismantling of the hydraulic hammer. I’ve never used a hydraulic hammer before let  alone dismantled one. I go to the operators manual. I’m not kidding  this thing is 800 pages long. Frustration  level,  mild. It’s 6:50. Chapter 3 page 179. Dismantaling attachments. Funny thing about this chapter… it doesn’t show removal with a coupler. Oh boy, here we go. The coupler has two hands, if you will, that grab the two pins of whatever you are attaching. The hands spread apart to grab the two pins and retract when you have to remove the attachment. Like the hydraulic hammer shown here.

Hydraulic hammer
Hydraulic hammer

So I’m looking at this thing saying to myself there has got to be a simple way to get this thing off. I try a couple of things. I see this little thing. A square bolt that is attached to the coupler.

This little thing, the square bolt shown here,nearly drove me to the brink of insanity for about three hours

I turn it one way a few turns and it stops. I turn it the other way (counterclockwise???? ) and it stops. I know this little thing is the key to getting the hammer off. It’s 7:45. Frustration level mounting rapidly. I cant believe I’m paying for this aggravation. I pick up the phone and call the rental company. They don’t open till eight but they have a 24 hour emergency service number. I call and leave a desperate message. Then my phone runs out of juice. Is this really happening on my day off? I go to my car and plug in my phone. What is it denial, rage, acceptance. I think for me it was rage,denial, rage, acceptance, rage one more time and throw a rock at the excavator. I realize I cannot work on this while my phone is charging so I go to the deli. I get two eggs on a roll with bacon. Sorry, but it’s not an egg on a roll without the bacon. Apologies to all pig lovers. (You’re not going to believe this but the emergency service guy calls me Monday morning at 8:30 and asks if I’m having trouble with the machine. This is like right out of the movies.) I’m really going to try and keep this a clean family friendly blog so I won’t print what I was thinking when this guy called me two days later.

8:20 AM. I call the rental company back. I get Joe. I think I woke him up. I explain to him my situation. I tell him I think I have to remove a pin in order for the hands to retract. He tells me no you shouldn’t have to remove anything. I know he’s wrong. I don’t tell him this though. We actually had a pretty good conversation. I think I just needed a little moral support. I finally figure it out. Pull the pin turn the little thing clockwise, junp into the excavator and disconnect the attachment put the new one on. Joe was right about the coupler though it was pretty easy to change the attachments once you get the hang of it. Here’s the machine with the bucket attached. By the time all was said and done it was 10:00AM before I started loading the concrete into the 20 yarder.

Hammer off, coupler about to grab the bucket.

As all of this was happening (Over the course of four hours)there was this tingling of fear and doubt about what I was doing.  I’m saying to myself did I make a mistake trying to do this? What if I can’t get it to work? What if I don’t have time to finish this weekend and have to rent it for another weekend? What if I damage the machine trying to take this thing off? What about the money I spent on this damn thing? And about a million other what ifs?

It was only later that I looked back and thought about the “Pass of Caradhras”. For those of you who don’t remember . The Fellowship has taken to walking over the mountain Caradhras after being seen by spies of Saruman. As they are walking over the snow covered peak Frodo “the ring bearer” falls and rolls down the hill a bit.When he gets up he realizes that the ring is not where it was. Boromir has picked it up. He holds it up to his eyes and says “Tis a strange fate that we must suffer so much fear and doubt over so small a thing…this little thing.” I really did suffer a bit of fear and doubt over that small thing.

Now I’m an expert at changing attachments. The rest of the day was spent digging the foundation and moving dirt. The footings for the Hoobbit house are called “Frost protected shallow foundations”. What this allows us to do is dig a shallower footing that is insulated to protect the footing from frost heave during the winter months. I thought this would yield less dirt(which it did) and I would have plenty of space to store the soil that I was excavating. Wrong again Jim. All of a sudden I realized I really don’t have that much room and I really don’t have great access around the site either. In fact I have access on only the front side of the site and that’s it. I get this crazy brain storm to build a ramp with the soil and pile it up so I can stockpile it up on the eastern slope of the site and out of the way. ( This way when I backfill the Hobbit house later I will just use this material). I build the ramp but when I drive up to the top of it I realize yet again that I’m making a mistake. This material has to be hauled out of here. There’s just no other way.  I have to make some phone calls.

This is going to be some adventure! See you soon.

Jim

Hobbit House: Foundation layout…Now the Journey really begins. And so does the Unexpected.

I really don’t know where this weekend has gone. It’s always amazing how fast time goes by when you’re really getting into something.

I had my wife laminate my building permit and I nailed it onto the garage over my temporary mailbox.  There always has to be some sort of twist to everything  that goes on. I was figuring to get started digging the foundation next weekend but as I looked at the list of scheduled inspections number one was inspection of the house stake out/ silt fencing. I hope they’re not looking for a surveyor to come up and lay this house out. That could wind up setting me back another week or so. As I look at the balance of the inspections I see “Slab Inspection: All under slab plumbing must be service weight cast iron.”  That’s great…Another thing I wasn’t expecting. I’ve never really worked with cast iron before . That should be interesting. Hopefully the plumbing foreman at my day-job is a nice guy and can give me some pointers. Maybe he’s a fan of The Hobbit.

For the uninitiated,it all starts with laying out the outer walls of the structure you are building. I don’t know if it’s me or what  but I always have a tough time with the batter boards and setting them up parallel and square. What? You don’t know what batter boards are? Are you serious? How long have you been in this business Moe?Apparently not that long. OK Moe this is what it’s all about . I mean even the Egyptians used batter boards to build the pyramids. It doesn’t sound like we’ve progressed that much. It’s a tried and true system though. I watched an episode of “This Old House ” once and Norm had the batter boards plumb, square ,level and parallel before the first commerical break. I was thinking Norm really knows his stuff.

I seem to be digressing. Oh yeah, the batter boards. Batter boards are for all intents and purposes a horizontal two by four nailed to two vertical wooden or steel stakes driven into the soil.  A nail is driven into the horizontal 2X4 and a string line pulled from the nail on one batter board to another at the other side of the foundation. The batter boards are placed far enough away from the house so they will not be disturbed during the excavation. This way when you are done with the excavation you just have to restring the lines and you have your rough layout. There are a million different ways of setting up batter boards here’s a bit of what I did.

Batter board layout of critical wall. This wall layout could not be one inch closer than the original structure was to the adjacent stream.

Northeast corner. I transfered the stringline up to a batter board on a tree above using a laser level. The x marks the corner of the house. I have to chop out the rock here.

 I should have asked for help from the men of Bree. It took me a couple of hours to do the layout.It was my first real day back working on the site in a long while and it was really nice out so I didn’t mind. I had a lot of thinking to do. Sometimes, at least for me, it’s better if no one is distracting me.

I don’t know what I was thinking but for some reason I thought that leaving the existing slab on the site wouldn’t be a problem. But after being there for the day I realized it’s gonna be a problem. There really is not much room around the site at all. I thought I would be able to bury the slab after taking it out but the more I thought about it I realized  that that would be just another hassle. So the next unexpected thing was that I would need another container for the slab and a hydraulic hammer to break it up with. The silver lining here is that it turns out I need a hydraulic hammer anyway. The layout in the Northeast corner hits rock ledge. It definitely needs to come out. I need a certain amount of clearance to get what I want for the passive house aspect of the slab. It’s more than I had originally anticipated but I want to get it right.

 I have to cut this post short because I have some other stuff to do and it’s getting late. There were a couple of other things I wanted to talk about but we’ll get to that next week.

It’s nice to hear from other people interested in passive Hobbit houses. For those of you who might be interested ,Lynn Dean from Texas has a kindle book that has just come out about Hobbit house designs. It looks very interesting and if you’re into Hobbit homes  you will definitely want to take a look. It’s called “Home Sweet Hole” and can be found on Amazon. Feasible fantasy floor plans in the Hobbit tradition. Enjoy!

I would love to come up with some words of wisdom right now that would finish this post off. I guess I have a bit of writer’s block. Let’s just end with this: No one ever said building this Hobbit house was going to be a snap but it sure is going to be interesting…

Have a nice week!

Jim

Bag End: A Passive House. Huh?

Thanks for stopping by. Just a few short comments this week.

If you read the bar title “From Hobbit  Shed to Hobbit House” you would have come across a sentence or two mentioning that a Hobbit House would be considered an earth sheltered passive house.  An earth sheltered home is obviously a home with some form of soil as its cover. There are a wide range of what some would call an earth sheltered home. There are also quite a few products that architects use to call the roofs on their structures “Green”. So I think we can all agree that  Bag End would be an earth sheltered home.

Calling a home a passive house is another thing altogther. The passive house standard is, in my opinion, the state of the art in building technology. It is a construction standard that was developed by a German physicist named Wolfgang Feist in the 1990’s and is just catching on in the US today. In order to claim that your house is a passive house the home must meet certain requirements. If it meets these requirements then it can be passive house certified by the Passive House Institute. I will be trying to meet these requirements as I build Hobbit Hollow.

I’m not going to get into the nuts and bolts of the requirements but basically a passive house has these attributes: 1.Low air infiltration. 2. Super insulation 3. Triple glazed high performance windows and exterior doors. 4. Energy recovery ventilation. 5.Elimination of thermal bridges.

These items when combined together properly will result in a home that uses 90 percent less energy than a new typical home built today. That is probably hard to believe but it is true.  This is what we are going for with this project. I am very excited about getting started.

As we go along on this project I will delve into each of these attributes from time to time.

This past week I had the opportunity to attend a conference sponsored by the Journal of Light Construction. It was called JLC Live and was held in Providence, Rhode Island. The session I went to was about building to the Passive House Standard and was given by a guy named Chris Corson. He built a passive house in Maine and is currently working on a few others. The Maine house was featured in The Journal of Light  Construction last year in the May and June issues. It was very helpful for me to hear a guy like Chris speak about the nuts and bolts of passive house construction. Without getting too technical I have always felt that this Hobbit  House we will be building will be an excellent fit for a passive house. We will see!

Just a quick update. My building permit was approved this past week and the electric utilitycompany connected my meter. I hope to lay out the footings next weekend! Of course I picked up the DVD of “The Hobbit”  Friday at Best Buy.  Whoever designed Bag End is a genius. I mean, who wouldn’t want to live in a house like that?

To the free folk of Middle Earth enjoy your week!

Jim


Do Hobbit Houses have underground electric?

Hello again Hobbit Hollow fans. Todays topic: Getting power to a Hobbit house.

Remember the house that was standing on the property before we demo-ed it. That actually had electrical lines running to it from across the street.  Part of the demo process was to call the electric company and have them disconnect the overhead wires. These wires went from the road over the stream and were attached to the second story of the house. This is pretty typical of most homes.

House before demolition. Electric wires are on the upper left.

Once the power was cut and the lines removed the problem was how to get power back to the property and into the new  house. I knew that the electric was going to have to go underground. The Hobbit house I am going to build is only going to be about eleven feet high. Running an overhead line to the house itself was not going to work.  The Hobbit house does not have an exposed side to attach wires to. Even if it did I would have to run a pole right beside the house and I didn’t think that would look good. Across the street stood the pole that the original house wires were attached too. I just figured I would have to add a pole in the general vicinity of where the original line came onto the property.

I met with an electrician on the site. I figured it might be a good idea to get some input into how much this is going to cost and if there is anything else  (i.e. permits, fees, etc.)  that I need to do before calling the electric company again. The guy I met with was great. His original idea was to run conduit under the stream from the pole on the street side right to the new house. As soon as he said that I was like: forget about that idea. This is a trout spawning stream in the state of New York. You want me to get locked up for killing all the baby trout in the state???? What is this guy, some kind of a wise guy? (For those of you who are unfamiliar with what a wise guy is watch the movie Good Fellas.) His next question was- OK but why do you want to put the new pole on the property in this location? Why not put it in the back and put a temporary service on it. This way the pole won’t be in the middle of your back  yard and you can trench the final service from the pole into the house later. You can also get temporary power and not have to use a generator for power during the construction phase. The Lord works in mysterious ways! What great ideas! I got a price from him.

This is the stream the power lines have to go over. If you look closely you can see the telephone pole on the right.
This is the stream the power lines have to go over. If you look closely you can see the street side telephone pole on the right.

After this meeting I got a few more prices and got quite a range in price. I forget the details but for some reason I was not able to have anyone do this work right away.I think the bridge wasn’t done and everyone said the truck to install the pole was to heavy for the wood bridge. Anyway, by the time I had the bridge done everyone was busy or didn’t return my calls. What’s up with these guys?

I go to the bank one day and I see a guy who’s got an electrician sign on the side of his truck. I ask him if he installs telephone poles and does service entrances. He says no but gives me a number for a guy who specializes in pole installation. I was like this is great. I call the guy up and he winds up giving me the best price for pole installation and I schedule him to come out and do the work. I finally have a pole!

I again try getting an electrician to come out and install a meter on the pole but have no luck. It is then that I remember my father. My father passed away a few years ago and he was the one who taught me how to wire houses. He wasn’t an electrician but he built and wired his own home way back when in the late sixties and was a real student of whatever he was working on. I built a few houses and renovated a few others over the years and he always was really into doing the electrical work. He really liked to do the service entrance the most and this would have been right up his alley. How could I not do it myself?

The big issue here is that you have to get an inspection for the service and have it approved by the fire underwriter before the electric company will hook you  up to the grid. So I have a pole, now the challenge was how do I mount the meter on the pole and run the conduit up 25 feet  to the top of the pole? There is no way you can use a ladder to do this. So I needed to set up a scaffold. I had some old scaffold at my house and had my sons help me put it up and secure it. I used 2X4s and what they call nailing cups to tie the scaffold to the pole. Once you have scaffold over 12 feet high it becomes unstable and can fall over if it is not securely braced. This scaffold was about 25 feet high. I used screws on the bottom to level the system up before I started. Here is a picture of the scaffold with the meter and conduit ready for inspection. The box below the meter is a 100 amp temporary service with 2 outlet boxes beneath it.

Electrical pole installed with working  scaffold in place.
Electrical pole installed with working scaffold in place.

 The wires that are used have to be resistant to sunlight because  when they are connected to the overhead wires they will be outside of the 2 inch conduit running up the pole. Another item that is critical is the grounding rods that have to be installed. The grounding system consists of two half inch diameter copper rods 8 feet long that have to be driven  straight down into the soil about 6 feet apart. I thought for sure we were going to have trouble doing this, there’s rock everywhere on this property. We took turns. I held the rod and my son used a 10 pound sledge hammer to drive the rods into the dirt. Then we would switch. It took us about 20 minutes or so. There was only one time I think we hit a rock but we were able to bust through it.  Here’s a close up of the grounding system.

Grounding system for the electrical service.
Grounding system for the electrical service. You can see the grounding rod attached to the green wires on the left.

Another very important part of the installation is to label the wires coming into the meter. There are two “hot legs” and one neutral. The neutral wire has to be marked with white electrical tape inside the meter and at the top of the mast where it comes out of the weather head. If you don’t do this the inspecter will fail the installation. Here’s a picture of the wires coming into the meter.  

Meter wired and ready for inspection.

 This was all about two and a half days work for me. I learned a lot and passed inspection. I should get hooked up to the grid within the next two weeks

My father would have been proud. I thought of him a lot while I did this work. I miss him.

I talked to the building inspector this past week, also. He said he should be done going through the house plans by the end of the week. Hopefully we will be issued a building permit by Friday.

And what is the matter with those New York Knicks? Maybe we need to write to the new Pope for some help on the court.

Best wishes, Jim