Hello again and welcome back to another installment of the Hobbit Hollow Construction Blog! It feels as though I haven’t written a blog post in quite some time for some strange reason. I feel like butter scraped over too much bread if, you will. (Okay, that’s a reference to the Fellowship of the Ring people.) Sorry for all you non-believers out there but that is our road. Like it or not. I think with a bit of patience and understanding most will be able to get beyond my little idiosyncracies. I hope so anyway because I am enjoying your company on this long road of ours. (Emphasis on long.)
Like I was saying, I’m glad you’ve returned.
I had the pleasure of going to a barbeque last weekend over at my brothers house and met with my cousin’s husband, Mike who happens to be an avid reader of the blog. He actually had a great idea which hopefully I’ll put into play over the next week or two. His idea was to do a visual history of the building of the Hobbit House. You know, something you can click on that will allow you to scroll through a whole series of pictures of what we’ve done since the beginning. I think I would probably put a separate heading on the tool bar when you log onto the home page. Not really sure what to call it. Hmmmm. Maybe Hobbit House: A Visual History, or There and Back Again, A Pictoral Guide to Building a Hobbit Home. Or the Editor’s choice, Death by a Thousand Cuts. I could go on and on. So if anyone has a good suggestion let me know. (Editor’s note: What about-Hey Look at This! It’s Just Pictures! Not All That Boring Stuff!)
On a side note Mike also showed me this outdoor pizza oven he built for his neighbor who is a chef. Man, what a great job he did. (Mike send me a picture and I’ll put it in the blog.) You’ve got to see this thing to believe it. Hobbits do love their pizza!
So I forgot to tell you all but we had our hardwood floors redone this past week at home. Boy, they really did a good job. The Editor and I are currently snapping at each other every time we slide our chairs back along the newly finished floors in the dining room. “You’re going to scratch the floor!!!!!” “Stop scraping your chair!” Okay we’ve lived in a home with scratched up wood floors for 20 years, this new way of getting up out of my chair is going to take some getting used to. Anyway, we also pulled up the hideous looking tile that was at our front door, as well. (Editor’s note: Jude and Zach pulled up the tile!) So part of this weekend was used to go to the tile store and pick out some nice tile for the front entryway. The Editor did some recon during the week but once we got there we stumbled upon something that was completely different. It’s an 8×8 natural slate with a lot of colorful veins in it. Really cool and definitely not for everyone. Very different. When I get it done I’ll throw a picture of it into the blog so you can check it out. So this tile store had some really nice stuff in it for the Hobbit House. The wheels were really turning. There will be quite a bit of tile work in the Hobbit house. Bathrooms, hallways, kitchen floor, backsplashes and the like. It will be fun to put that all together later on. Hobbits love their tile.
Football season started this weekend, as well. Terence had a Friday night game up in Pine Plains, New York. They lost in overtime which was tough but they played really well as a team and had their chances. A fun game to watch. The only problem was I didn’t get to bed until midnight. So work this weekend really just consisted of stripping two of the skylights and laying out the studs for the front wall of the Hobbit House.
The skylights came out okay. I’m really happy with the detail I came up with for them. I think it’s something that will last a lifetime and that is what we’re shooting for here. Zero maintenance over time. When you’re pouring something that’s on a pitch such as a sloping roof or a ramp you usually like the concrete to be tight. When it’s tight it’s a lot easier to get it to stay where you want it to stay but there tend to be voids or honeycombs in the concrete. I knew this was going to happen but the key here is that this concrete is really in a sense a protective layer. I’m thinking of trimming out the sides with a PVC type trim and the top is going to have a plywood topping and then roof shingles on it to finish and help flash the actual skylight. You’ll see. The top is going to look like a conventional roof. Here’s a picture.
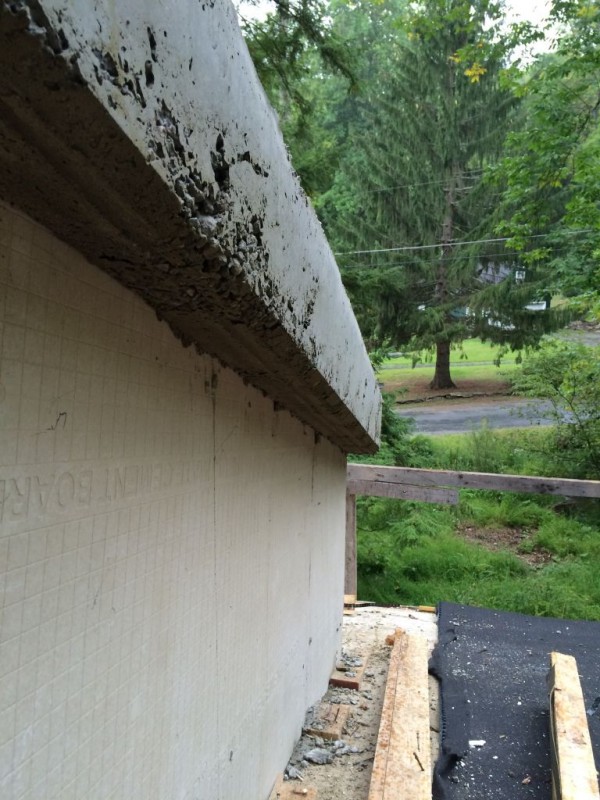
A little rough around the edges but it gets the job done.
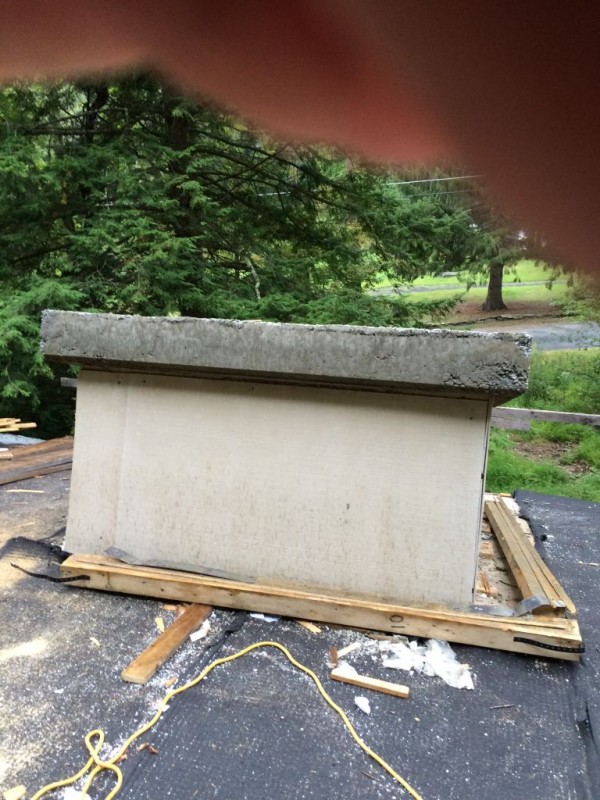
The concrete really locks the whole thing together really nice. This detail is a keeper. Sorry about the thumb! I think this is the first picture I’ve put my thumb in.
The next order of business was to set myself up for next weekend. I’m going to order out the windows and doors this week so I really need to get going on the exterior framing. So I basically have about 10 weeks to get everything ready for window installation week.
So I never really got a chance to explain the fine art of Hobbit House framing and layout so let me just brief you on it. The bottom floor plates are easy. They’re just the same as any old conventionally framed house. You know, layout your door and window rough openings and then layout your stud walls at 16 inches on center. There’s a bunch of different ways to do layout so we won’t get into that here. The tricky part is getting the floor plate layout onto the top plate. Since the ceiling of a Hobbit House is curved you can’t just pull your tape and run out the layout on 16 inch centers like we did on the floor. The length of the ceiling is dimensionally longer than the floor and the pitch of the roof is constantly changing as well. Therefore each stud that we laid out on the floor will have a different corresponding layout length on the ceiling plate. Hmmmm. What to do?
The problem I face now is that nobody in my family can stand the minor details of what it is I’m doing. So there’s this push and pull as far as how technical I should get before everyone loses interest. I know my family has already lost interest but the debate rages on as far as other readers are concerned. The Editors voice still ringing in my ears, “Nobody understands what you are talking about!” Jude and Terence’s voices: “I don’t read it I just look at the pictures!” Well maybe there is one or two of you out there that are interested, so we’ll keep going.
There are a bunch of ways to get the layout up and in the right location including but not limited to a plumb bob and a level. I have the good fortune to have access to a vertical dot laser level. What this does is project a vertical dot onto the ceiling. So really all you have to do is place the laser over the layout line on the bottom plate and then mark the dot on the top plate. 1,2,3, done. Check this out. So easy.


That was easy. The only issue is that you have to go up and down the ladder for every single location so it’s time consuming.
Lastly, and of course by no means leastly, is the issue of what to do while people are refinishing the wood floors in your home. It’s a two step process. Day 1 they sand the floors and hit it with one coat of polyurethane. Day 2 they add a second coat of polyurethane. This stuff really stinks so you can’t be in those areas of the house while they are drying. So day 1 we ate over at my mother-in-laws house because we couldn’t eat home that night. I’m not a picky eater, okay? Not at all. In fact if I went into some of the things that my mother made me eat as a child you would say I was quite adventurous as far as eating is concerned.
So it’s chicken and rice night over at my mother in laws house, right? Right. I like chicken and rice. In fact I would even expand on that and say I love chicken and rice. Only problem was we didn’t have chicken and rice. We had ckicken and bird seed. Yes people that’s what we had. Some might say that’s not what we had but when you don’t cook the rice correctly what you wind up eating is essentially bird seed….and I’m not a bird. But I got through it. Initially. We all know what happens to rice when it gets cooked, right? It expands. So it was a two fold process. First get through the eating of said bird seed/rice and second wait for the expansion aftermath. Needless to say I got about an hour and a half sleep that night. It was brutal. The expansion process turned out to be a lot rougher than one would think. I sense a bit of a setup here. I mean this is a woman whose been cooking her whole life. Her excuse: “The slow cooker must have been faulty.” Yeah, right.
We went out for dinner on day 2. Need I say more?
(Editor’s note: Let’s be factually correct here. You worked late the second night and got Subway on the way home! And the chicken and rice was much better once she cooked it a little more!)
I’ll let you know if we add anything extra to the home page!
Enjoy your week!
Jim
Didnt miss my weekly read!! I will look those photos up and try to get them sent to your post, Kelly is coming home this weekend I will ask her to do it for me. It was great seeing you Jodi and family at your brothers, they were probably getting upset about me asking about the house but it is such a great project!! Anyway hope you keep adding the technical details in your posts they really help explain how much planning goes into it. I promise I will watch The Lord of the Rings before Terris’ wedding, might take me that long to get through it but I will!!
Mike thanks for writing! Glad you are one of the few of the growing ranks who are enjoying the technical aspects of Hobbit House building.
Yeah that pizza oven you built is definitely blog worthy. If you have trouble sending the photos wait till the wedding and you can send them to my phone. I don’t know how to do it but one of the kids there will be able to handle it I’m sure.
Oh and don’t sweat the Lord of the Rings stuff. If anything just watch the begining of the “Fellowship of the Ring” and you’ll get to see where my inspiration came from. 7 minutes of your time…and I think it’s on Netflix.
See you at the wedding!
Jim
Hi, Sally.
Around here everything is built on a concrete slab. A concrete roof is a little unusual, but the same things apply. There isn’t a “vapor barrier” under the walls, but there is usually something called a “sill seal” under the exterior walls. This is just a really thin foam pad that is supposed to act like a gasket and seal out leaks. (Sometimes they leave that out and just spray foam the joint after the fact, but I think the sill seal does a better job.)
The other thing they do is that any wood that is in contact with the concrete has to be pressure treated. Concrete is a little porous, and moisture will build up between the wood plates and the slab. That can rot them in a big hurry if they aren’t treated lumber.
I like the technical stuff too. That’s the main reason I started reading this blog – to learn new building techniques. Sorry your family isn’t fascinated, but I am.
Did you bend or piece the top plates? Are you putting any sort of vapor barrier between wood and concrete?
Hello Sally I’m glad you wrote. Yes Sally the family is definitely not fascinated. I’m really not to sure what the correct word would be but fascination is not one of them.. Hmmm. Better not go there. I still need them to help me out!
The top plates, by the way, were just pushed up and held in place with a few different sized 2×4’s. Once they had the plate exactly where they wanted it they used the Hilti TE-6 to secure it in place.
There were a bunch of things I never really got a chance to explain because the boys were doing the work while I was at work. I kind of explained what I wanted them to do over the weekend and then let them have at it.
I’m glad you’re still enjoying the blog.
Thanks as always!
Jim
PS. No vapor barrier between the wood and concrete. We’ll get to vapor barriers at a later date. Take care!
will I ever live the rice story down? with you I don”t think so.you’ll have it on my grave stone. It was a faulty cooker, I have it all packed up to return to QVC.I’ll make it up to you I’ll make a big pot of gravy,meatballs and sausage.when I bring it over I’ll also take along some Kaopectate just in case.Ha Ha Ha. Luv ya
You are absolutely correct. I’m never going to let you live this one down. This one incident gives me enough ammunition for a couple of years at least! I’ve already got your Christmas present picked out, “How to Cook Rice in Three Easy Steps!”
I really do hope you get your money back from QVC. I think that was the hour where they try and swindle all those little old ladys. You’re going to have to call up now and give them a little of the Old Mount Vernon in you.
See you at the game!
Jim
Jim,
Great idea about the picture slideshow.
I enjoy reading the technical stuff, it’s like getting a PhD in Construction Management!
Mike
Hey Mike! Yeah the picture slideshow is a good idea. I just got an e-mail from my web guy. He’s says it should be up and running in about a week. I’ll probably add a few pictures every week.
So apparently there are at least 3 people out there who are enjoying the technical aspects of the Hobbit House,you being one of them, so I guess I’ll keep it going!
Thanks for writing Mike!
Jim